
DIY Longtail Cargo Bike - Intro
For a year or two now I have been gazing longingly at various longtail cargo bikes (top 5 longtail cargo bikes), thinking it would be nice to own one. However, with framesets starting at around £500, I am relectant to spend out on somthing that will not get used very often. So I have decided to modify an old steel frame MTB to make a DIY longtail cargo bike.
To expect a work of art would be foolish on my part, so my goal it to make a functional and probably dog ugly cargo bike. I have tons of bike bits and wheels so my aim is to reuse all of these bits.
If you would like to read about the biked above, then please read on. However, I have since built a Long Tail E Bike, which can be seen here. Image of said bike below.
DIY Longtail Cargo Bike - Choosing a Frame
Really the only limiation here is what you can weld / braze together. For most people this will be steel. I found a second hand steel mtb frame on ebay, which is a raleigh yukon. It appears to be a 501 chromoly frame and although it does not have very good cabling options it should suite.
Things to look out for are a 1 &1/8 " headset and a standard bottom bracket. V brake bossess are fairly essential or disc brake bosses (oo la la). Don't dispair if you have a frame with no bosses as you can also opt for hub brakes. I don't no if they are standard to ukons but this frame had a weird plastic cup bottom bracket which was seized in place and had to be burned out, slightly warping the threads in the process.

DIY Longtail Cargo Bike - Extra Tubing
If you intend on extending you frame to make a long tail cargo bike you will need some extra steel. I got some carbon steel tubing from Dyfed Steel (They cover wales and the southwest UK). It is approximatly the same size as the main tubes on the frame. I think maybe smaller tubing to match the seat and chain stays would have been a better option, but there we are, the di is cast as they say.
DIY Longtail Cargo Bike - Chip Chop
Taking a hack saw to the frame is fairly nerve racking. Choosing where to make the cuts will depend on what type of frame you have purchased. I chose to seprate the seat stays from the seat tube and cut through the chainstays around an inch from the bottom bracket. This was not a great move, it would have been better the leave the seat stays attched to the frame and made the cut a few inches out, welding on the seat tube is not a good idea as any mishaps, such as melting a hole in the seat tube will result in the seat post not fitting. This happeded to me and resulted in much filling.
Note the string that has been used to line up the
frame (when viewed from above. I have used builders fixing strap to fix
the two sections of the frame to a square of plywood, this is usefull in
that it keeps the two section approximatly upright and also allows the
the whole assessmly to be tilted so as to ensure a horizontal rear seat.
Let me explain . ..
If you are working on a level floor, you can tilt your plywood, with frame segment attached so that the drop outs are equal heights when measured from the floor, then use a spirit level to check the level of the top rear tube (red). When the wheels are added later on these equal heights will be preserved, as will you horizontal rear top tube.
To determine the correct bottom bracket height run a string from the front drop-out to the rear drop outs. It should run just over (2mm) the top of the bottom bracket shell.
TIP- Rememeber that welding near threads (such as the bottom bracket) will result in them being heated, and they may need to be retapped. Which is a hassle.
DIY Longtail Cargo Bike - Welding
A gasless mig welder is probably the secound worst choice you can make for a job of this kind, an arc welder being the worst. Really a TIG welder or Oxy / Propane or Acetylene are your best bets for a neat job, also they help avoid disasters such as melting through the tubing. TIG welding is very technical so I would opt for oxy / Acetylene .
Try and get tubing with a similar gauge to the exisiting, as this will help with quality and apperance of welds. Of course I am using two different type of steel (carbon and chromoly) and so like for like I will need a thicker carbon steel tube, becuase it is weaker than chromoly.
As you can see my £90 gasless mig welder is wholy unsuited to frame building. So for the rest of the welding I am switching to a TIG welder (Read a beginneers Gudie on TIG Welding) this was a poor choice on my part, particulalry as a bnovice. TIG welding is a very skilled process with a mind bggling number of variables. But unless you wish it introduce high pressure containers of flammable gases in to yor garage, then that is the best there is. A good mig wedler may be the best option.
CONTINUED IN CHAPETR 2
Desktop Study
Flood Risk
For a year or two now I have been gazing longingly at various longtail cargo bikes (top 5 longtail cargo bikes), thinking it would be nice to own one. However, with framesets starting at around £500, I am relectant to spend out on somthing that will not get used very often. So I have decided to modify an old steel frame MTB to make a DIY longtail cargo bike.
 |
| The Result |
To expect a work of art would be foolish on my part, so my goal it to make a functional and probably dog ugly cargo bike. I have tons of bike bits and wheels so my aim is to reuse all of these bits.
If you would like to read about the biked above, then please read on. However, I have since built a Long Tail E Bike, which can be seen here. Image of said bike below.
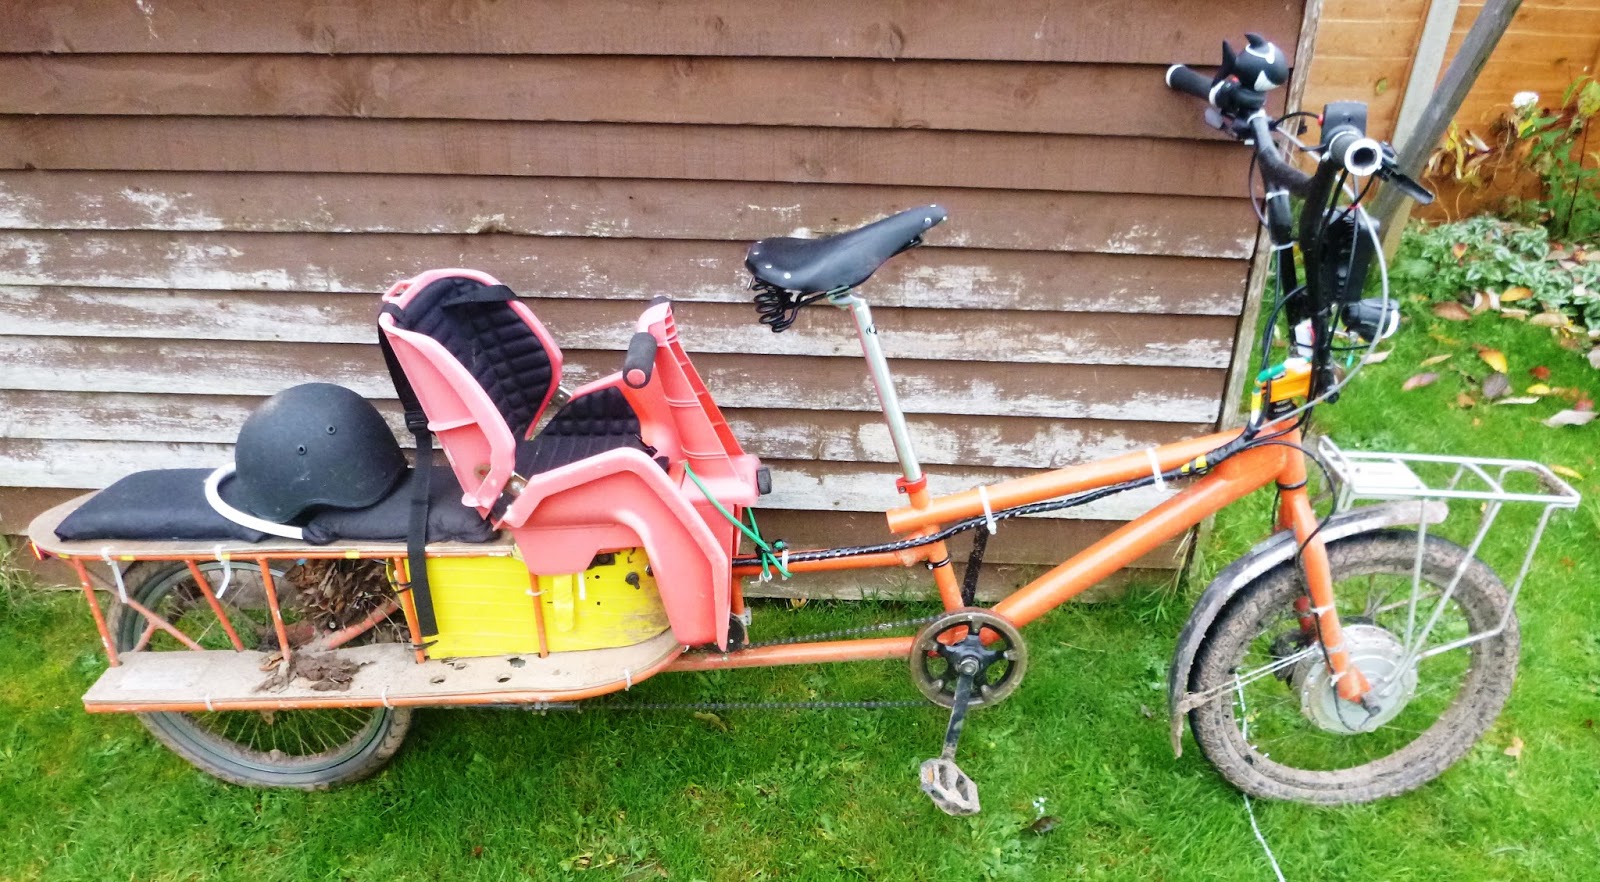 |
| An alternative build for your consideration. . . . |
DIY Longtail Cargo Bike - Choosing a Frame
Really the only limiation here is what you can weld / braze together. For most people this will be steel. I found a second hand steel mtb frame on ebay, which is a raleigh yukon. It appears to be a 501 chromoly frame and although it does not have very good cabling options it should suite.
Things to look out for are a 1 &1/8 " headset and a standard bottom bracket. V brake bossess are fairly essential or disc brake bosses (oo la la). Don't dispair if you have a frame with no bosses as you can also opt for hub brakes. I don't no if they are standard to ukons but this frame had a weird plastic cup bottom bracket which was seized in place and had to be burned out, slightly warping the threads in the process.

DIY Longtail Cargo Bike - Extra Tubing
If you intend on extending you frame to make a long tail cargo bike you will need some extra steel. I got some carbon steel tubing from Dyfed Steel (They cover wales and the southwest UK). It is approximatly the same size as the main tubes on the frame. I think maybe smaller tubing to match the seat and chain stays would have been a better option, but there we are, the di is cast as they say.
DIY Longtail Cargo Bike - Chip Chop
Taking a hack saw to the frame is fairly nerve racking. Choosing where to make the cuts will depend on what type of frame you have purchased. I chose to seprate the seat stays from the seat tube and cut through the chainstays around an inch from the bottom bracket. This was not a great move, it would have been better the leave the seat stays attched to the frame and made the cut a few inches out, welding on the seat tube is not a good idea as any mishaps, such as melting a hole in the seat tube will result in the seat post not fitting. This happeded to me and resulted in much filling.
 | ||
| Overall Layout |
 |
| Repostioning of the rear triangle. |
 |
| Getting a level rear seat. |
If you are working on a level floor, you can tilt your plywood, with frame segment attached so that the drop outs are equal heights when measured from the floor, then use a spirit level to check the level of the top rear tube (red). When the wheels are added later on these equal heights will be preserved, as will you horizontal rear top tube.
To determine the correct bottom bracket height run a string from the front drop-out to the rear drop outs. It should run just over (2mm) the top of the bottom bracket shell.
TIP- Rememeber that welding near threads (such as the bottom bracket) will result in them being heated, and they may need to be retapped. Which is a hassle.
DIY Longtail Cargo Bike - Welding
A gasless mig welder is probably the secound worst choice you can make for a job of this kind, an arc welder being the worst. Really a TIG welder or Oxy / Propane or Acetylene are your best bets for a neat job, also they help avoid disasters such as melting through the tubing. TIG welding is very technical so I would opt for oxy / Acetylene .
 |
| Why not to use a gasless mig welder. |
 |
| As good as it gets with gasless mig. |
Try and get tubing with a similar gauge to the exisiting, as this will help with quality and apperance of welds. Of course I am using two different type of steel (carbon and chromoly) and so like for like I will need a thicker carbon steel tube, becuase it is weaker than chromoly.
As you can see my £90 gasless mig welder is wholy unsuited to frame building. So for the rest of the welding I am switching to a TIG welder (Read a beginneers Gudie on TIG Welding) this was a poor choice on my part, particulalry as a bnovice. TIG welding is a very skilled process with a mind bggling number of variables. But unless you wish it introduce high pressure containers of flammable gases in to yor garage, then that is the best there is. A good mig wedler may be the best option.
CONTINUED IN CHAPETR 2
Desktop Study
Flood Risk


.jpg)
.jpg)
.jpg)
.jpg)
.jpg)
.jpg)
.jpg)
.jpg)
.jpg)
.jpg)
.jpg)
.jpg)
.jpg)
.jpg)
.jpg)
.jpg)
.jpg)
.jpg)
.jpg)
.jpg)
.jpg)
.jpg)
.jpg)
.jpg)
.JPG)


