Monday, 28 August 2017

Thorpy's Non-Technical Speaker Crossover Guide

Thorpy's Non-Technical Speaker Crossover Guide


Intro


There are plenty of guides around on the web showing how to build speaker crossovers.

However, I found most be a bit mathematical. You will need maths if you a building the perfect set of speakers, but for a functional set, you can use these rough instructions. They worked for me.

Crossovers are normally hidden inside a set of speakers and so unless you are building your own boom box, or set of speakers, you may never have seen one before.

I have taken some of the more simple advice on the web and dumbed it down still further, for those who want to see some pictures, and just have a go.

I have no clue how any of this works. But I have built a boom box, with the below components, some homemade / DIY, and it works. So I would urge you to have a go too.

What does a Crossover do?


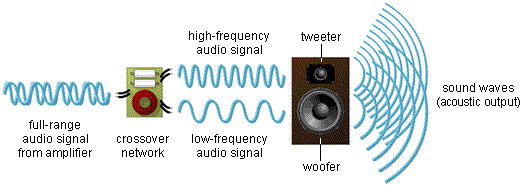
If you look at most speakers they have two drivers, a tweeter for treble  (high pitch sound) and a larger driver for mid range and bass (low pitch sound).

What does a cross over do? Well it filters the sound and delivers high frequency sound only to the tweeter, and low frequency sound to the large driver.

Do you need a Crossover?


Sometimes no. Sometimes yes. Most speakers have some form of crossover. But how can you tell if you need one:

Example 1 - A crackly / distorted / snicky sounding tweeter may require a filter to get rid of the low pitch sound, that it is not designed to handle. In this case you would want to filter out low pitch sound, with a "high pass filter", which can be done with a capacitor (see below).

Example 2 - A harsh sounding mid / bass driver that is getting too much treble. In this case you would need to filter out the high pitch sound. This can be done with a "low pass filter", this is done with an induction loop.

What do you need to build a cross over?

Here is a picture of my setup. (I am sorry to say that the capacitor in this picture is covered with glue, so it is a little hard to see. But it is there! Click on the image to make it bigger)

Ugly but Functional


Ingredients - You will need:


  • Soldering Iron & Solder
  • Insulated Copper Wire 2 or 3 Meters
  • Bi-Polar Capacitor 40V +
  • Sticky Tape
  • Glue
  • Chunky Steel or Iron "Core for Inductor"*

*I used the spindle from a industrial motor, but you could use a bit of scaffold pipe, or a big bolt or a piece of broken round file. It has to be iron or steel.

Install a High Pass Filter (also called a "Bass Blocker")


A high pass filter is very easy to install, you will need a bi-polar capacitor.

Polarised or Bi-Polar


Now as a general rule you should choose a capacitor with a voltage above 40V, but the higher voltages will also work, although they offer no advantage. The "uf" can be anything you like, and will probably work OK. Search here.

Just solder the bi-polar capacitor between the positive amplifier output and the the positive terminal of the tweeter. The the tweeter should be "fed" power through the capacitor.

Top Tip: Do not look directly at the capacitor when you power up you system. It may explode if you have chosen the wrong voltage or type (polarised or bi-polar). If you look the other way the bits won't go in your eyes.

Install a Low Pass Filter (also called a "Treble Blocker)


To make your low pass filter (induction coil) take around 2 to 3 meters of door bell wire, or other single cored insulated wire, and wrap is around your chunky steel or iron core. Leave enough spare wire poking out so you have enough to solder it to where it needs to go.

An Induction Coil - Very Techncial

Power needs to be fed to you bass speaker through this coil. So you wire one end to the positive supply from the amplifier and the other to the positive terminal of the speaker. (Scroll back up to the labeled picture to see how)

Conclusion

As mentioned this will not get you a top notch speaker, but it will make a horrible sounding speaker sound OK. 

By example, before installing these DIY crossover coils, I had to have the equaliser on my iphone on bass booster, and the sound was still too harsh.

After installing I can switch the EQ off, and they sound well balanced, I used an induction coil (low pass filter) taken from a professionally made speaker for the left hand side, and my DIY induction coil (low pass filter) on the right hand side. I cannot tell any difference by listening between the speakers. So the homemade one is working it would seem. 

For Reference - This is a professional made induction coil. Note PAM8610 amplifier bottom Right.

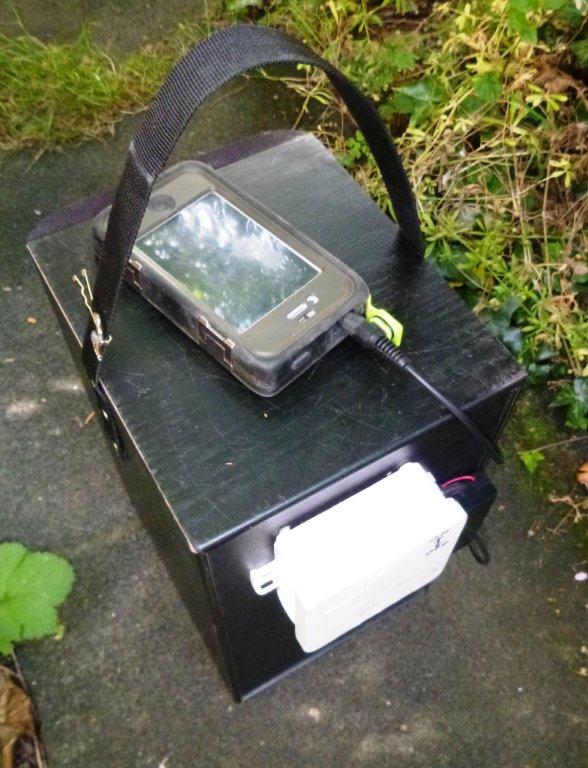
For reference I am using a PAM8610 to run this portable speaker, from 7 x AA batteries. The speakers were taken from some low quality active speakers. Also I should point out that you can get a pretty good bluetooth speaker for £30 / $50. So do not spend too much money on this unless you are doing it for fun!

Inside my DIY Portable Speaker


Environmental Permitting

Environmental Permit Applications


Wednesday, 16 August 2017

Unstable / Surge Voltage for XL6009 Buck Convertor

Unstable / Surge Voltage for XL6009 Buck Convertor

I am new to electronics, and this small boost convertor has me baffled. It displays some weird behaviour. One sets the voltage using the small brass screw, but then if you watch and wait the voltage climbs from the set voltage, 5 Volts in my case up to 28v or higher. I have also observed the same behaviour when setting the boost converter to 10v.

This has resulted in me destroying a bluetooth amplifier, because after setting the voltage at 5V, and connecting the voltage climbed to 28v and killed the amplifier board (PAM8403).

I am powering the XL6009 board, with a headway 8ah LIfePO4 battery at 3.9V, which is rated for 100A output. So I do not think insufficient power is the problem.

If you have had any joy with this sort of thing O would appreciate some help.


Friday, 14 July 2017

Make a Portable Speaker with PAM8403 Amplifier

Make a Portable Speaker with PAM8403 Amplifier - Intro


Do you have an old speaker or two hanging around in the garage or loft? Would you like to make a kick @$$ portable speaker for just £3 / $6? Left me show you how.

Lets get real here, you are not going to save lots of money you can probably buy a portable speaker, for you iphone or android phone direct from china for £6 / $12, but this way you get to save a trip to the dump, and get some satisfaction.

For more power you might try the PAM8610 or for complex Build the TPA3116

Old Speaker + £3 = Disco


Make a Portable Speaker with PAM8403 Amplifier - Ingredients


You will need the following ingredients:


  • An old speaker (4, 6 or 8 ohm) lower ohms = more volume.
  • Some wire (door bell, lead from old adaptor. . . )
  • Battery Holder to hold 3 x AA or 3x AAA batteries  
  • PAM8403 amplifier board
  • A drill 
  • screw driver
  • Soldering iron
  • solder
I have gone in to detail regarding the battery holder and the PAM8403 amplifier below.


Make a Portable Speaker with PAM8403 Amplifier - The Amplifier


You can buy the vanilla PAM8403 board on ebay for next to nothing but for a few £/$ more you could get hold of a blue tooth variant. This is useful if you want to use a phone without the 3.5mm jack socket.

There also variants with a volume control, and a smoothing capacitor. This may be worth getting if you do not have a spare capacitor

Bluetooth . . . . . volume control . . . . . or vanilla (normal) the choice to yours.

Make a Portable Speaker with PAM8403 Amplifier - Power Source


The amplifier run on a any voltage between 2.5V and 5.0V. This means you can power it with:


  • 3 x AA batteries
  • 3 x AAA batteries
  • USB power lead from PC or Wall Adaptor
  • 1 x 18650 Battery
  • A USB power bank
I have tried with a USB power lead, and then 3 x AA batteries both worked very well. 

The amp have two channels (left and right) and as far as I know you have to use both channels. You cannot splice the two channels together to make one. 

Make a Portable Speaker with PAM8403 Amplifier - How To

So the old speaker I have had a tweeter (small high frequency speaker) and woofer / midrange speaker. I used one "channel" from the amop for each. I cant remember which way around I put them. 

You will need to remove the cross over if there is one, save the capacitors for re-use.


In order to do this you will need to open up the speaker and, take a wire from either the woofer or the tweeter, you may find that you have a cross over unit in there, you will need to by-pass this so you can create two separate channels. Keep the cross over and carefully remove one of the capacitors for reuse, in a moment. You will need to solder this in to the positive wire of the tweeter. Like this:

Adding a capacitor as above will improve sound quality.

I first tried the amp and speaker together without this capacitor and the tweeter sounded distorted. However, after adding the capacitor all was well. 

The amplifier is tiny. . . note pinky (little finger) for scale.


Next up we need to start soldering all the bits together, if you do not have a soldering iron just buy one. They are useful for all sort of mending and fixing and making. As you can see the PAM8403 amplifier is tiny. And this makes for fiddly soldering, you can only use thin wire as the holes are too small for thick wire. 

Wiring is simple. . .but fiddly!


So for simplicity I house the wiring in a surface mounted junction box on the rear of the seapker, I had one of these spare in the garage. But you could actually just put all of the wires inside the speaker if you wanted to. Although it would be more fiddly to work on. 

3 x AA Battery Holder - £1.99


This cheap battery holder from ebay has a built in switch (counter sunk). I screwed it on to the rear of the speaker. With 3xAA batteries in side in produced 4.5V, good quality rechargeable batteries are preferable to disposable, as they hold a higher charge for longer, so voltage stays are close to the optimum (5V) as possible. 


Toggle switch. . . if you like.


I also added a toggle switch that I had as it is a nicer switch to use, than the one on the battery holder. You can also use a piece of cord, rope or strapping as a carry handle. 

Carry Handle


Make a Portable Speaker with PAM8403 Amplifier - Performance 


The sound level of the finished speaker (4 ohms / 4.5V ) is approximately 60 - 70 decibels. You cannot really have a normal conversation in the same room. As a 35+ year old man, I find it unpleasantly load at full volume.

There is quite a lot of midrange and high pitch sound, and perhaps some more bass would be a good, but overall for a piece of hardware that cost 99p, and is the size or a postage stamp it is amazing . . almost alchemy in terms of its performance. 

This is a fun, low cost project that I have enjoyed doing, and I would urge you to do the same if you require a speaker of this type rather than buying some other hard to recycle item from china.


Environmental Permit Applications

Thursday, 13 July 2017

Living with iOS 9.3.5 on an iPhone 4S

Living with iOS 9.3.5 on an iPhone 4S  - Intro


I have been avoiding upgrading my iOS since iOS 7. However, on wednesday night I drank too much red wine and upgraded, because an app I wanted to use requires iOS 9 or higher.

What a mistake to make. My snappy adequately fast phone was rendered sluggish and virtually useless. So what can I do?

Living with iOS 9.3.5 on an iPhone 4S  - Down-Grade - NO WAY


Apple must know that older devices will not run there newer iOS properly, and hope that the performance of iOS 9 on older devices will force people to upgrade. For this reason they do not offer a way to downgrade your iOS. 

There is one exception, and that is 6.1.3 which is still "signed" for use on the iPhone 4 (not 4S). There is 3rd party software avaiable to do this, if you have iOS 9.3.4, but not for iOS 9.3.5.

So this is impossible for 9.3.5.

Living with iOS 9.3.5 on an iPhone 4S  - Jail-Break - NOOOO WAY


This is also not possible, iOS 9.3.5 is not jail-break-able.

Living with iOS 9.3.5 on an iPhone 4S  - Re-Install and Performance Mods - WORTH A SHOT


This is the only way left for people, and I think by following the below steps you can claw back the usability of you iphone 4S.

9.3.5 Reinstall

  1. Back-Up Your Iphone (Use iTunes)
  2. Reset (Settings > General) Choose (Erase All Content and Settings) 
  3. Restore from Back Up when Done.
Note: This freed up a lot of storage space for me. Despite having most the same apps and music on the phone after restore. Perhaps the old iOS is not deleted from the phone when it is upgraded?

9.3.5 Performance Mods


Do the following:
  1. Turn Off Animations (Settings > General >Accessibility)
  2. Turn Off Transparency (Settings > General >Accessibility)
  3. Turn Off Back Ground App Refresh (Settings > General)
  4. Enable Low Power Mode (Settings > Battery)
  5. Delete All Unwanted Apps (Hold Down Any App Icon Until Wobble)

Living with iOS 9.3.5 on an iPhone 4S  - Conclusions


APPLE! It should not be like this, serve the customer please. If I want to install Windows 3.1 on my PC I can. . . . this means I do not have to send my old PC to india, for kids to dismantle, and go to early graves with lead poisoning. . . there is a moral element here!

Every time you make a new iphone there is also a carbon cost, it is no good prattling on about how considerate you are in you CSR reporting if your belligerent attitude towards legacy hardware is causing mountains of E-Waste, and unnecessary Carbon Emissions. You know global warming, that thing that Trump Ignores. . . but then he is a pretty good guy after all.   


Illustrator Devon


Tuesday, 11 July 2017

Daphon GA-1 Amplifier Review

Daphon GA-1 Amplifier Review - Intro


WHo wants a new blue tooth portable speaker when you can use a chunky black box, attached to your phone with a cable? I appreciate that this is a guitar amp, but I also thought it might be good for playing music through. . . . .turns out NOT. It is not even a very good amp, and yes I am considering the fact it is small and runs on batteries.

Daphon GA-1 Amplifier Review
A nice looking amp with a quality feel. . . . 

Daphon GA-1 Amplifier Review - Battery


This GA-1 takes a 9v power pack (LR6) what a faff that is , why not 6 xAA? That would be so much cheaper and easier. So that is a really annoying feature. Considering the amps performance (low) then you need to keep the battery in prime condition to deliver good sound, otherwise more distortion, and there is PLENTY of that any way.

Daphon GA-1 Amplifier Review BAttery
Really? That is the best battery option you could think of?

Daphon GA-1 Amplifier Review - Sound Quality

Terrible. There is something to be said for it small size, and if you are playing in your bedroom or maybe at a BBQ in the woods. . . . but the sound quality is so so poor, its hardly worth having. Using it a speaker for say music from an iphone is a terrible idea, as the sound distorts at an incredibly low volume. 

The Insides let this amp down. . .badly


Daphon GA-1 Amplifier Review - Insides

Inside the amp we see the board is centered around a panasonic (AN7142) 0.9W chip. This is well below the advertised 2W output, or leagues away from 5W max output touted.

Now I am not a electronic guy, but you can get amp chips that support 5W. So what have they done in there? Whatever they are doing it certainly looks as though the internals could be better.

A low power chip may be to blame for the terrible sound?

Daphon GA-1 Amplifier Review - Manufacturers Blurb

This is the blurb straight from daphon:

Portable Performance Amp

A perfect beginner guitar amp or a busker's best friend. Because of it's battery power you can have amplification wherever you are. The amp has the capacity to produce decent volume and you have control over your sound through tone control. Flick the drive button for a crunchy overdrive. Also suitable for microphones, though an impedance transformer is recommend for best performance.

Hours of Fun on a Single Battery

Runs on a single 9 volt battery (the rectangle type) that can last many hours depending on volume, can also be powered by a 9V ac adapter. The amp is 20cm / 16cm / 8cm in size and a headphone output is included for silent playing.

Music On-The-Go

Also a great portable music speaker. Just plug in your Mp3, Ipod or Discman via the input and you can have access to music wherever you go.

Daphon GA-1 Amplifier Review - Dimensions


Dimensions: 20cm x 16cm x 8cm
Weight: 1.2kg
Maximum power output: 5W
RMS power output: 2W

Daphon GA-1 Amplifier Review - Conclusions

A well built case a solid feeling controls, let down by very poor quality internals.

Environmental Consultants

Environmental Permitting

Thursday, 29 June 2017

Schwalbe Dirty Harry BMX Tyre Review

Schwalbe Dirty Harry BMX Tyre Review - Intro


These are a cheap BMX tyre from Schwalbe. However, do not be fooled by the price, this is an excellent tyre that could be used on folding bikes, kids bikes as well as BMXs and have an excellent building quality and a good multipurpose grip. It comes in 20" (406) variant only, and is 1.95" wide.

Schwalbe Dirty Harry
Not Just for BMX


Schwalbe Dirty Harry BMX Tyre Review - Grip


The tread pattern is ideal suited to street riding, loose gravel riding, and dry dirt. Where it quickly comes undone is claggy mud, where the closed block tread pattern quickly clogs. The tread pattern is also quite shallow, this is advantageous in that the "knobs" do not flex when under load but a disadvantage as they clog more readily. 

Schwalbe Dirty Harry
Tread Pattern Looks Flash and is Good for All Except Thick Mud

The rubber compound is SBC (Schwalbe Basic Compound) as used on early Big Apple Tyres and is perfectly adequate, although not as good as some of their high end compounds. 

Schwalbe Dirty Harry BMX Tyre Review - Build Quality 


These are a moderately high quality tyre. But is has one blinding feature that most other BMX tyres do not have, a kevlar puncture protection belt (Kevlar Guard). This is an excellent feature, and will stop punctures from just about anything, except hawthorns. 

Side View


The TPI is s little low if you want to carry large loads, but for normal riding is is very good. These have a soft feel when riding when compared to a very high TPI tyre such as the Eclat Ridgestone.

Tread Deatil

Schwalbe Dirty Harry BMX Tyre Review - Conclusions

A cheap reliable tyre form a quality brand, with excellent puncture protection. A tread pattern suitable for all sorts of surfaces. . . .what's not to like?


Thursday, 8 June 2017

Informal Tender or Sealed Bids - Buyer's Guide

Informal Tender or Sealed Bids - Buyer's Guide - Intro


I am not an expert. But we have recently bid on a property using the Informal Tender or Sealed Bids process, and here are some observations which may be useful to you.

Informal Tender or Sealed Bids - The Property's Price


This is set by the estate agents to generate interest in the property, so it is likley to be below the actual value of the property.


You could complicate things here my trying to work out how much the property is worth. But the really the simple fact is, it is worth whatever you are willing to pay for it.

You don't really like it? - Bid 20% below  Price

You really want it? - Bid as much as you can afford*.

*I did look at some other similar properties nearby and this confirmed my suspicions that the property was under priced. For example if you are looking at a 3 bedroom terrace house for £180,000, and most property that are similar  sold recently for £220,000, then this will give you some idea of the level of bid that could be placed. Remember if you bid too much the mortgage company will find that the property is over-valued, and likley not lend you the money to buy it.

Informal Tender or Sealed Bids - How are the Bids Decided


Price would be a major factor with the buyer likley accepting the highest offer.

However, if to similar offers are received, then the buyer will likley choose the offer that which does not rely on chains or borrowing.

A chain free cash buyer would be most favourable, although I have read on line that cash buyers are not always the first to be picked.

Informal Tender or Sealed Bids - How to Bid


Ask the estate agent for a Informal Tender form or proforma, for you to fill out. If they do not have one then include the following information in a letter:

  • Title - Subject to Contract Informal Tender
  • For - The Address of House you wish to Buy
  • Your Name (s)
  • Your Address & Other Contact Details 
  • Is your offer and ability to proceed dependant on another property? Yes or No
  • If yes give details. 
  • Level of borrow you anticipate.
  • State of agreement regarding borrowing i.e. Agreement in Principal. 
  • Name of your Solicitors
  • Other things you think might be relevant. 

Informal Tender or Sealed Bids - When to Bid


You are hopefully delivering a envelope or an email to your estate agents.. . . . . . 

If the people running the tender are less than honest then it does not matter when you submit you bid, as the process is rigged. In this instance it may be advantageous to submit your tender at the last minute, so as to give the organiser less time to react.

If the people running the tender are honest, then nobody will see you bid other than the honest organiser and the vendor, so it does not really matter when you submit your bid.


Informal Tender or Sealed Bids - Can You Bid more than Once?


Yes, just submit a revised offer if you think you may have bid too much or too little.


Informal Tender or Sealed Bids - Have You "Won"?


You will normally find out within 1 or 2 weeks after the closing dates for bids. It may be that if you are the second best bidder, and the first best bidder withdraws then you might be in with a chance.

This is was the case when we bid, we were "significantly lower" than the winning bid, but for what ever reason they pulled out, and we are now buying the house!