Tuesday 5 December 2017

EMWC - Reverse Osmosis - 5 Stage - Review & Fitting Tips

EMWC - Reverse Osmosis - 5 Stage - Review - Intro


First off if you are buying this to treat tap water in the UK don't bother. Tap water in the UK is the most highly regulated in the world, in terms of quality. Depending on where you live you may be lucky enough to get mineral water out of you tap for free!

Residents of Portsmouth for example get beautiful calcium rich chalk aquifer water out of their taps. And the Drinking Water Inspectorate place strict limits on any nasties full stop. Do not bother treating mains tap water.

If you however use borehole water that is contaminated with heavy metals, pesticides or other then please read on . . . .


Takes up Most of Room Under Sink - Not a lot of room for Washing Up Liquid


EMWC - Reverse Osmosis - 5 Stage - Review - Cost


The East Midlands Water Company sells well priced reverse osmosis units, at around the £150 mark at the time of buying. This is pretty cheap considering how complicated the unit is. However, just like buying a cheap printer, you could expect to make up for it with the cost of the cartridges. The 5 filters in the units at present are around £60 to replace, although you can order extra for not much money with initial purchase.

Bearing in mind the unit does not work the cost even if £1 would be too high.

EMWC - Reverse Osmosis - 5 Stage - Review - Quality


This worries me. I am not saying that the RO unit does not function, but the connections between filters are numerous and the the fitting are small and do not inspire confidence.

The unit operates at mains pressure! So small screw fit plastic connectors make be worry a bit. If one of these "popped off" there would be £1000s of damage done in just a few hours. Other higher cost system feature much more robust connectors and less of them.

Plastic Fittings do not Feel Very Sturdy


Like I say I am sure it is fit for purpose, but this is a mains pressure system, and as such could be conceived as a bit flimsy.

The instructions that come with the kit are OK, but a bit more details wouldn't go amiss. Also I did not have enough inserts to put in all the pipe ends. Which was a bit annoying, how much does an insert cost 1p? And I was short. The fitting for the top of the pressure vessel will not seal with PTFE tape, so get a role of that prior to fitting. Again they could include roll of this (50p), you need it for fitting.


EMWC - Reverse Osmosis - 5 Stage - Review - Fitting Tips


Fitting is fairly simple. But any mistakes will lead to much damage from leakage so this ups the stakes a bit, it is not an enjoyable process knowing the risks are so high. Especially considering the flimsy nature of the connectors. For fitting you will need:


  • Drill with c.12mm drill bit - To make hole in sink for tap.
  • File Possibly - To enlarge hole in sink.
  • Smaller drill bit - for fitting waste pipe
  • Some silicone to seal waste pipe, if not using kit (optional extra)
  • Screws and screwdriver for mounting inside cupboard
  • Sharp knife and chopping board to cut pipes to length
  • Adjustable spanner for tap fitting.
  • PTFE Tape to seal tank threads
PTFE Around Tank Thread


It took me around 3 hours. Although the last hour I was also cooking tea at the same time. 

EMWC - Reverse Osmosis - 5 Stage - Review - Taste


The water tastes pretty flat, this is to be expected as you are pretty much drinking distilled water. Mineral filters are available to the put the minerals back in before you drink it. I have not done any analysis on the water to test how effective the treatment is. 

Lots of Tubes!


EMWC - Reverse Osmosis - 5 Stage - Review - Conclusions


This is certainly is as very cheap option for those wishing to treat water to a high state of purity, however the fittings do not inspire confidence. 


Waste Transfer Station Permit

Sony SRS-XB3 Portable Speaker Review

Sony SRS-XB3 Portable Speaker Review - Intro


The Sony SRS-XB3 is a smallish portable bluetooth speaker which has been superseded by the SRS-XB30. I went for the SRS-XB3 because it does not have all of the gimmicks that the SRS-XB30 has. If you want flashing lights and "demo modes" and all of the that annoying faff that gets in the way of listening to music then go for the XB30.

Understated - Satsuma for Scale


Sony SRS-XB3 Portable Speaker Review - Size


The  SRS-XB3 is about 20cm long and 8cm tall. Approximately the size of a battenberg cake. Or three rubix cubes in a row. It can be stood on end to fit in the narrow space on a book shelf or laid longways.

Sensible Size - Fits in Bag or Glove Box


Sony SRS-XB3 Portable Speaker Review - Battery Life


The battery lasts a long time. Specs say about 8 hours, so for me it will go over a week between charges. Of course as with all lithium batteries it is best to keep the battery topped up. Discharging the battery a lot will shorten its lifespan.

I have not used the speaker for charging USB devices, but this will shorten battery life. It is however a handy feature.


Charging, USB Port and Line In - Open Rear Flap


Sony SRS-XB3 Portable Speaker Review - Connectivity


Music via bluetooth or via 3.5mm auxiliary port. The bluetooth is quick to connect and the connection is steady when used within the same room. The aux port takes a standard 3.5mm headphone jack. So you will need a male to male connector lead to use this, which is not supplied, but can be had for £2 / $4 on ebay.

The SRS-XB3 remembers which device it is paired with after it has been switched back on. This is handy as you do not have to re-pair the speaker to the audio source (such as phone). However, if you are switching to another phone or player then you just hold down the pairing button on the top of the unit until you hear a beep, and then connect . pair through the settings on you phone / player.

Clearly Labelled Button - Very Easy Setup


Sony SRS-XB3 Portable Speaker Review - Sound


The most important bit. The speaker is small, but the tone is very rich. This richness can be enhanced by turning on the "extra bass" feature, which I seldom switch off! The rich bass is very noticeable at low to moderate volumes, however when using the Sony SRS-XB3 at higher volumes the bass is reduced, with treble and midrange becoming more predominant.

The sound is produced by a two small speakers and 2 passive radiators. These are wobbly bits of rubber that wobble in and out in time with the speakers and act as extra speakers. One of these passive radiators is front facing the other rear facing. This is good, as you can place you Sony SRS-XB3 in the corner of room perhaps 30cm for a wall, and the rear facing passive radiator causes reverberation from the walls = extra extra bass!

When listening to EDM I find it helps to place the speaker in the corner. You get a free power boost this way.

Specs - 15V x 2.5A = 30W approx RMS Music Power


Sony SRS-XB3 Portable Speaker Review - Conclusion


This is a good little speaker. The depth of bass for its size is most impressive, although it lacks very deep bass you may get with larger speaker systems. For day to day listening and radio listening it is perfectly adequate, and if you wanted to crank up the volume at the weekends then it can be quite loud.

Interestingly this speaker can be linked with a 2nd Sony SRS-XB3 Portable Speaker, to form a stereo listening experience, which would double the volume and create a more dynamic sound


Environmental Permit Applications

Tuesday 21 November 2017

Shimano BR-BL-M355 Review

Shimano BR-BL-M355 Review - Intro


This is my second purchase of these brakes. I have one on the front of my cargo bike for around a year. It has been a good brake, so when my Avid BB7 on the rear of my normal bike got so stiff I couldn't adjust the pads any more, I thought I would upgrade to the BR-BL-M355. A newer budget offering from Shimano is the MT200, click link to read review. 

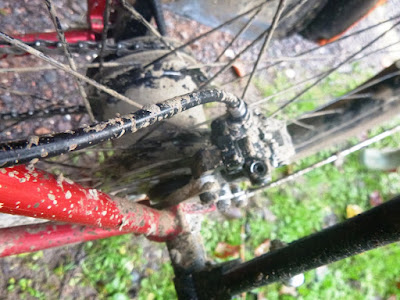
Basic but Neat

Shimano BR-BL-M355 Review - Build Quality


There is nothing fancy about this brake, but its does have the normal budget level of shimano quality about it. The finish is clean, the parts are well machined. I think the bleed nuts might be stainless. . .that sort of thing.
Quality Mouldings

This is a low end kit though, the brake lever is made from pressed steel plate rather than aluminium which you normally find on most breaks. But I like steel so thats cool.

Pressed Steel Lever. . Fine


Shimano BR-BL-M355 Review - Fitting


Fitting is a sinch. You have to remove your grips etc. to slide this thing on the bars, but that no big deal. Use hair spray squirted under grips (prise up a little with thin screwdriver or small allen key) to loosen them up and then more hair spray inside when you put them back on.

The brake are pre-bled, so it is literally the case of just attaching them to the bike, and hey presto done! Fit and forget.

Note Adjustment Screw for Reach


Shimano BR-BL-M355 Review - Performance


Mounted on the front of my cargo bike one of these will stop a very heavy bike on all but the steepest of hills. My cargo bike with me a 3 kids on it weighs 180kg, so thats not too shabby. On the flip side pulling this much weight to a standstill does munch the pads!

Calipers Lack. . which is good.

Performance in my experience is fine. If you want modulation or some sort of fancy braking then waste more money on "better" brakes.

Shimano BR-BL-M355 Review - Conclusion


Shimano Quality. Cheap as Chips. Stop you Well. . . . What else do you want? More bling . .shame on you! Spend the money on your wife.

Top View
Fin.

Environmental Permit Applications

Thursday 9 November 2017

Vent Axia Lo-Carbon - Review & Install Guide

Vent Axia Lo-Carbon - Intro


For the most part the instructions give a good of idea how to install this thing. But the template that comes with the heat recovery fan is pants.


Vent Axia Lo-Carbon - Install Guide


There is one inadequacy with the instructions provided. That is the cable entry point, and also no description of how long the cable should be.

1 - The Cable Needs to be Long


The cable entry point (centre left of template) is around 15 - 20cm away from where you need to connect the cable internally (top left of unit). After leaving 10cm of cable sticking out of the wall, I was left short. Despite the requirement for a long cable there is very little room behind the unit for connectors etc. which makes adapting cable length with clamp type connector difficult.


 2 - Cable "Threading"


You also have to thread the cable through the body of the extractor fan. This would be relatively hard to do with 2.5mm cable. Bit probably OK with 1.5mm or flexible.


3 - Template 


There is nothing wrong with needing a long wire, but wire not mention this on the template!


4 - Run Off a Socket?

Yes you can run this off a socket. Handy if you want on and off to be timed. 


Vent Axia Lo-Carbon - Review

It seems to work OK, in terms of heat recovery. It is a bit noisy however. I used to ventilate my garden office with a couple of 120mm fans from a PC, which was better in terms of noise.

If I went again I would likley buy a passive MHRV unit for £99, some ducting and use PC fans again.

This vent axia lo carbon does have a boost function which shifts a lot of air, and also a summer bypass flap, so you can set it to just extract in the summer. 

Its a good bit of kit . . . . just a little too noisey. 

All the best,

dorkythorpy

Obviously this system could burn your house down if connected up incorrectly, and any cutting of wires will void any warranties. Do all of the above at your own risk. After all I have just written about what I am doing, it is your choice if you decide to do any of the above.


Environmental Consultants London

Monday 6 November 2017

How to Install a Vented Tumble Drier

1- How to Install a Vented Tumble Drier - Intro


A condenser tumble drier is easy to install. Because you do not need a hole in the wall of your house. However with a vented tumble drier you need a pipe or duct that takes the warm moist air out of the tumble drier, and blows it outside.

2 -How to Install a Vented Tumble Drier - What Tools will You Need?


A professional would use a large diamond core bit, to make a perfect round hole. However this tool is not really worth buying for 1 job. Although they are about £20 on Ebay so not too bad.

Basic - Hammer and Masonry Chisel (It is be harder to do a neat job without a drill)

Intermediate - Drill with 120mm long masonry bit & Hammer and Chisel

Well Equipped - SDS Drill with chisel function

Pro - Diamond or Tungsten Core Bit

You will also need a tape measure, a marker pen and a vacuum cleaner is ideal for tidy up.

3 -How to Install a Vented Tumble Drier - What Materials?

A vent kit may be you cheapest option, and will likley come with instructions, so that could be a good bet if you are doing this for the first time, or not a keen DIYer.

If you are short of cash or need to get your drier up and running quickly, you could make the hole and pull the flexible duct through that is supplied with the direr, as a short term solution. Just make sure you allow the duct to hang downwards externally, so water will not run in.

You can also use a peice of 100mm waste pipe, and and a vent cover externally. This is what I used.

4 -How to Install a Vented Tumble Drier - Where to Make Your Hole?


Most tumble driers designed for domestic use will have a 100mm vent duct. Ideally you do not want you vent pipe to exit the wall any lower than 1 meter, to prevent rodents using it as a door. Realistically you will be limited to the the height of your kitchen worktop which is usually about 90cm. In short keep the vent hole a high as possible.

In the example shown below the drier is installed in a cupboard (door must be left open when in use) and the vent exits more than 1 meter above external ground level.

Important: The rigid duct should slop down hill towards the outside of the property. Otherwise the rain will run through the pipe in to you kitchen. Also condensation.

5 - How to Install a Vented Tumble Drier - Making the Hole 

A vent kit may be you cheapest option, and will likley come with instructions, so that could be a good bet if you are doing this for the first time, or not a keen DIYer.

It is better to start from inside, but you will need to have a think about where you hole will emerge on the outside of the house. Are there an pipes or cables in the wall? Is there a meter box (!) or similar close to where you hole will emerge?

Take a piece of you rigid ducting or in my case 100m waste pipe, and us it as a stencil, position the hole as discussed in section 5.

A - Draw Around your Chosen Ducting

Next take your drill and make a series of hole around the line the you have just drawn.

B - Drill A Series of Holes & Chisel Out

Now you will need to chisel out the bit of the wall you have made you holes around, it is better to chisel because it make less dust. When you have finished chiselling you should have the following. .


C - Remove Insulation
Once you have chiselled out your hole, your will likley see the insulation in the wall cavity, this can look like wool, polystyrene or it could be foil coated.

If it is wooly (as pictured) poke it out of the way. If polystyrene or foil backed foam, you will need to cut a circular piece. I did this from outside. I like working outside!


D - Check Holes Line Up

When you are looking through the hole, there is likley to be a strong draft blowing dust etc.through it. It will slow you down if you have any eye full of fibreglass so don't get too close. 

E - Install Ducting
Next tap through you rigid duct. It may not go through first time, you may nee to get the old hammer and chisel out again to remove extra bits of masonry before it will slide through. When it is flush / parallel with the wall on in the inside, mark the pipe flush with the wall on the outside, and then slide it out a bit to cut with a saw. 

The rigid duct is now installed, first go inside and slide you tumble drier in to position, you can then reach through the pipe from the outside and pull the flexible duct in to your rigid duct. Then install the vent extract external cover.

F - Install External Vent Cover

Comments appreciated good or bad.

Environmental Consultants London

Wednesday 1 November 2017

Netgear WN3000RP Review

Netgear WN3000RP Review - Intro


There are a great many wifi range extenders on the market. If you are a fan of Netgear products (TP Link are a good alternative) then you may have come across the Netgear WN3000RP.

Summary: A good quality piece of equipment that performs well once setup, but let down by a very glitchy user interface.

Netgear WN3000RP Review - The Good


This small booster will work as a range booster or an access point. Quick explanation:

Booster: Picks up a wireless signal using aerials attached and fires it back out again at increased "strength".

Access Point: Allow access to a wired network. You could route a wired network through the WN3000RP so at to provide wireless access to that network.

I have used both features at two different houses and they work well . . .  once setup. The wireless access point I am running at the moment take ethernet from a powerline adaptor, and spews forth internet goodness in to our home.  This enable me to keep the router near the broadband source, and have an access point where we actually use wireless devices.

Because the WN3000RP allows access to our wider home network, it also allows us to use network printers and other back resources that are sited 100 meters from the house in my office.

The signal strength will pass through a 18" or 40cm thick stone wall. Although it is a little weak. In our old house which was built from concrete blocks the coverage was strong throughout the whole house.

Netgear WN3000RP Review - The Bad


Because the aerials are on the side it takes up too much room when using a multi-socket, so that is a bit annoying.

Netgear WN3000RP Review - The Ugly


The setup process is trying. In order to set this thing up you connect to it over wireless and then log in using the default password etc. As soon as you change any of the settings you are disconnected which you would expect. However, half the time when you do finally manage to re-connect you will find no progress has been made.

Choosing a SSID (Wireless Network Name) other then the one suggested creates all sorts of problems, so best avoided for you own sanity. All in all very frustrating. It could be that all range extenders are like this, it is the only one I have every had.


Environmental Consultants London

Friday 13 October 2017

How Many Tons can You Shovel by Hand in 1 Hour / 1 Day

How Many Tons can You Shovel by Hand in 1 Hour or 1 Day

This is a quick note to say how many tons a fit healthy strong(ish) person can shovel in 1 day if properly motivated.

Recently I received 16 metric tons (16,000kgs) of crushed lime stone delivered tipped out of a lorry in to a heap. I manged to load this in to wheel barrows with a normal shovel during 7 hours of shovelling.

This would give an approx rate of 2 tons per hour, with a short walk included to empty the wheelbarrow. A few notes from this example:


  • The Gravel was Easy to Shovel (30mm max gravel size) 
  • The gravel was spread over a 30 meter long drive way.
  • I am a well fed, 90kg bloke who keeps fit.
  • You can shovel 16 tons in one day.

I am not sure if I could have repeated this the following day! But I dare say you would get used to the work after a couple of weeks!

I worked as hard as this for my own benefit, it was stressful and I was exhausted afterwards. I would not expect one of my employees to move the same amount. 

Tuesday 12 September 2017

TDA2030A & TDA2030 Amplifier Observations

TDA2030A & TDA2030 Amplifier Observations - Intro


I have recently built portable battery powered speakers using a PAM8403 and a PAM8610. They are very efficient "Class D" amplifiers and can be run on high volume for hours and hours on one set of AA batteries (1.3ah).

However, I would like more bass! So I have tried this TDA2030A "Class AB" board to see how it compares. The TDA2030A is almost identical to the TDA2030. The former have a slightly higher max wattage rating.

This amplifier can be built on to boards that can handle up to 22V although 36V is achievable in some applications. I was limited to 16V by the capacitors that were installed on my pre built board, purchased from ebay (fluxworkshop).


TDA2030A & TDA2030 Amplifier Observations - Current


This is perhaps the TDA2030A amps most troubling characteristic. It requires 3.5A of current (max current), this means that with anything other than top end AA batteries such as "Eneloop" you will not be able to run this on AA batteries. They would also drain quickly even if you could!

The limiting factor it appears with the use of AA cells is the battery holder box. After testing one of the springs had melted and slumped.. I have read elsewhere that the cheap AA battery holders are only good up to about 1.5A.

So . .  you will need a power supply from the mains. . .or lithium high drain cells or an SLA Battery. Again the battery holder for the lithium cells will have to be good quality.

By comparison the PAM8403 and a PAM8610 draw about 1.0A of current which is ideal for use with AA batteries and cheap holders.

I tried the following batteries:


  1. 6 x AA 1.3ah Uniross Batteries in Holders - Not Good
  2. 5 x 4.5ah NiMh (Battery Pack from Silva Headtorch) - OK
  3. 1 x 12V SLA (Actually LiPO4 but in SLA Type Package - Nominal current 7A) - Fine


TDA2030A & TDA2030 Amplifier Observations - Voltages 


To get good performance out of this amplifier you will need to run it higher than the minimum voltage of 6V, in fact even at 9V the output is distorted and low power. The sound is clean when at low volume (60db), but push past that level and the sound is terrible.

I have read else where that this chip sings better at 22 volts, but I can't try that. I can report that at 15V (SLA fresh off charge) it performs well. Running with no distortion at full volume (70- 75db).


TDA2030A & TDA2030 Amplifier Observations - Heatsink


The board I purchased came with a very small heatsink. It looked small to me, so I salvaged a heat sink from an ancient graphics card and used that. I also applied some thermal paste between the chip and the sink. 

A Larger Heatsink - Perhaps Not Required
The TDA2030A (or TDA2030) as I configured it does not generate very much heat, the heat sink as pictured above get slightly warm to the touch, so a small heatsink, such as the top picture in the post would probably be OK. 


TDA2030A & TDA2030 Amplifier Observations - How Loud

I would estimate 75db, specs say 85db. So specs say around 10 time more than I do! But this is running at 22V instead of 16V.

In comparison to PAM8403 the TDA2030A is louder, but PAM8610 running at 12V and 1A is far far louder. 

TDA2030A & TDA2030 Amplifier Observations - Sound Quality


The sound quality of this small "Class AB" amplifier is pretty good. It has better than the "Class D" Amplifiers that I have tried. 

I would describe the sound from this amplifier as richer, than the other class D offerings. There seems to be more depth to the sound, it is less flat than the Class D amps. 

I am sorry for the subjective nature of this appraisal, but that is the best I can do. 

TDA2030A & TDA2030 Amplifier Observations -  Pros & Cons


Con - If you were build and battery powered portable speaker with this it would like cost 3 x times that of a Class D build because of the battery. 

Pro - Slightly Better Sound Sound / Richness

TDA2030A & TDA2030 Amplifier Observations - Photos

Very Small Package

Large Battery in Webbing Pouch

Bag of Spanners! (Ugly)

Environmental Permit Applications

Friday 8 September 2017

Use Apple Pay Without Passcode

Use Apple Pay Without Passcode - Intro


You can NOT do this!

Despite being able to use my "real" contactless card without a passcode, Apple have decided I am a child, and need to be controlled.

There is a slightly less annoying work around. . . . .  or you could just buy a roll of gaffa tape!


Use Apple Pay Without Passcode - Work Around

First off you need to disable touch ID, it is rubbish anyway, being completely unreliable and denies you access to your phone just when you need it, normally when you are in a rush or in a meeting. 

Go To:

Settings > Touch ID and Passcode

If you do not have a passcode then set one up (Turn Passcode On). When you are choosing your new passcode, you will see small writing "passcode options", here you can choose a 4 digit passcode (like the old days), which will keep you safe without wasting your precious time. 


If you are currently using a 6 digit passcode then you will need to:

Settings > Touch ID and Passcode > Turn Passcode Off

and then. . . .

Settings > Touch ID and Passcode > Turn Passcode On

First Turn Passcode On (Turn On and Off to get 4 digit code)

you will then see the above screen with the "Passcode Options". 

Next we need to minimise the number of times you will be required to input the passcode, which can be got down to about 3 or 4 times day using the below option. 

Settings > Touch ID and Passcode > Require Password

By default this is set to "Immediately" which is really annoying. Select "4 hours" or what ever you feel is good for you.


Choose 4 Hour Delay before passcode is required. 

Use Apple Pay Without Passcode -  Conclusion

So you can now use apple pay, only have to use you passcode 3 or 4 times day, and when you pay. It would be very nice if I only had to use passcode when I paid, but like I say I am child and can not be trusted, thank goodness apple are there to protect me!

If like me you are on and off you phone all day perhaps 50 + times (who isn't) this workaround will allow you to use apple pay, whilst only having enter passcode 2 or 3 times a day. 

I hope this keeps you sane, if all else fails just use some gaffa tape to stick your contactless card to the back of you phone. 

Waste Transfer Station Permit

Illustrator Devon

Monday 28 August 2017

Bor Yueh BY-201 Front Rack Review

Bor Yueh BY-201 Front Rack Review - Intro


I needed to fit a child seat to the rear of my bike, and wanted panniers for shopping too. So front rack is the route I went. This unlike a "lowrider" rack allows you to use full size rear panniers on the front of your bike.

A few years ago, people would have started talking about centre of gravity, but thanks to the marketing powers of firms like Salsa, "bike packing" sees luggage mounted all over bikes, typically very high up. I am not saying it is good, but it has become more trendy to have an unstably loaded bicycle. So I should not need to justify the whole COG thing.

Update: 06/09/2017

I have tested this rack with a 35kg load. Which consisted of 2 large panniers and a medium sized child. I travelled 10 miles with this load and bumped down curbs, and did some violent steering. All good. So a bit stronger than that 10kg mentioned on the website.


Smallish RAck - Full Size Panniers


Bor Yueh BY-201 Front Rack Review - Fitting


The rack comes with a selection of nuts and bolts for fitting, as well as plates for mounting, and what not. The only criticism here would be that the bolts are all screw driver type bolts and not allen key variants / jobbies.
No Caption - Self Explanatory 

You will require a hole in the fork crown (where the mudguards are bolted on) and also some forward facing rack mounts on the bottom of the forks. I doubt this would fit on to mudguard mounts, although there are some spacers provided which may get this to work.

Bor Yueh BY-201 Front Rack Review - In Use


I have owned one of these a few years ago. They are a good rack. Issues it for 2 or 3 years with no issues. So this is a 2nd purchase, which must count for something.

As mentioned in the intro this puts your luggage above 6" above low rider height. This really doesn't bother me in the slightest, and I can use any of the rear panniers I already have on the front of this bike.

Bor Yueh BY-201 Front Rack Review - Photos


View from Above - Lack of Allen Bolts is a Shame

Fixing are however, Sturdy

Mounting Point at Fork Crown 


PAM8610 Amplifier Review & Build

PAM8610 Amplifier Review & Build - Intro


I was very impressed with my 99p PAM8043 has enabled me to build a small portable speaker for just a few pounds.

Off the back of this success I thought I would build a more powerful portable speaker using a PAM8610, which costs . . . .  £1.99 so still a cheap project.

This is the board variant reviewed.


This more powerful board delivers 15W per channel, and runs on 12v (7v to 15v). I was hoping for more sound, which was delivered, but the quality of sound is far below that of the PAM8043.


PAM8610 Amplifier Review & Build - Power Supply


The 8610 will run on 7 x AA batteries (1300mah) for many hours at a moderate volume. A week's worth of morning and evening listening is achievable on one set of batteries, approx 12 hours. At full volume I would estimate 1 or 2 hours.

(2x15W) 30W / 12V would indicate a 2.5A current requirement, so if you choose a 12V AC adaptor for power probably best to go for 3A as a minimum.

The maximum voltage specified for this amplifier is 15V, the more volts supplies the greater the power output of the amplifier.

PAM8610 - More Volts = More Power (15 v Max)
I have tried this amplifier on  10.5V, 12V and 15V. I would say that after 12V there is little advantage to be had in terms of power output. When listening to music using headphone lead from iphone connected to amplifier, I can turn the volume to 90% running of 12V without distortion. At 15V I can turn it up to 70% without distortion.

So you may save the battery in you iphone a bit? But the extra volume is not worth the bother just stick with 12V. However, many SLA batteries will be near 15V fresh off the charge so it is useful to know that it runs well at this voltage.

It is interesting to note that many listing on ebay or elsewhere say that this amp will take 16V, the the specs it says 15V max. I will try it at 16V and see if it survives.

PAM8610 Amplifier Review & Build - Speakers


Many of the more complex boards using the PAM8610 require an 8 ohm speaker. But if you buy the basic board, then you can run a 4 ohm speaker . . .  the more complex boards do not really offer any advantages in terms of performance, although they are easier to use, with no soldering required (provided you have the right connectors!)


PAM8610 Amplifier Review & Build - Sound


The sound was a bit disappointing at first. It is a very mid tone heavy, to the point where it is harsh. Whilst the PAM8043, has a rich sound even when unfiltered this amplifier requires a low pass filter on the woofer, in order to make it listenable.

For example, without a low pass filter, you will require a graphic equaliser to try and remove some of the harsh mid range sound, and having tried this I can tell you it is not a very good option.

PAM8610 Amplifier Review & Build - My Set-Up


This project ended up looking a bit messy, because it had to be reworked so many times, attempting to get the right sound. In the end the addition of low pass filters was the breakthrough, that finished it off. I had tried stuffing the cabinet with wool to change sound, but this was unsuccessful.


The DIY low pass filter was easy to make. I just wish I had thought of it earlier. I had to make sure that the bass / mid range driver and the tweeter were fed separately through their respective filters.

Note size of PAM8610, very small. 

A close up of the amplifier and the wiring, between it and the speaker. The coil, shown below is the professionally made variant. Whilst above right, is a DIY effort that worked adequately.

Amplifier will happily sit on it own wiring, as it weighs next to nothing.
I did not worry about mounting the amplifier to the inside of the cabinet, as the the board is so light, it will sit happily suspended on its own wiring.


Environmental Permitting

Environmental Permit Applications

Thorpy's Non-Technical Speaker Crossover Guide

Thorpy's Non-Technical Speaker Crossover Guide


Intro


There are plenty of guides around on the web showing how to build speaker crossovers.

However, I found most be a bit mathematical. You will need maths if you a building the perfect set of speakers, but for a functional set, you can use these rough instructions. They worked for me.

Crossovers are normally hidden inside a set of speakers and so unless you are building your own boom box, or set of speakers, you may never have seen one before.

I have taken some of the more simple advice on the web and dumbed it down still further, for those who want to see some pictures, and just have a go.

I have no clue how any of this works. But I have built a boom box, with the below components, some homemade / DIY, and it works. So I would urge you to have a go too.

What does a Crossover do?


If you look at most speakers they have two drivers, a tweeter for treble  (high pitch sound) and a larger driver for mid range and bass (low pitch sound).

What does a cross over do? Well it filters the sound and delivers high frequency sound only to the tweeter, and low frequency sound to the large driver.

Do you need a Crossover?


Sometimes no. Sometimes yes. Most speakers have some form of crossover. But how can you tell if you need one:

Example 1 - A crackly / distorted / snicky sounding tweeter may require a filter to get rid of the low pitch sound, that it is not designed to handle. In this case you would want to filter out low pitch sound, with a "high pass filter", which can be done with a capacitor (see below).

Example 2 - A harsh sounding mid / bass driver that is getting too much treble. In this case you would need to filter out the high pitch sound. This can be done with a "low pass filter", this is done with an induction loop.

What do you need to build a cross over?

Here is a picture of my setup. (I am sorry to say that the capacitor in this picture is covered with glue, so it is a little hard to see. But it is there! Click on the image to make it bigger)

Ugly but Functional


Ingredients - You will need:


  • Soldering Iron & Solder
  • Insulated Copper Wire 2 or 3 Meters
  • Bi-Polar Capacitor 40V +
  • Sticky Tape
  • Glue
  • Chunky Steel or Iron "Core for Inductor"*

*I used the spindle from a industrial motor, but you could use a bit of scaffold pipe, or a big bolt or a piece of broken round file. It has to be iron or steel.

Install a High Pass Filter (also called a "Bass Blocker")


A high pass filter is very easy to install, you will need a bi-polar capacitor.

Polarised or Bi-Polar


Now as a general rule you should choose a capacitor with a voltage above 40V, but the higher voltages will also work, although they offer no advantage. The "uf" can be anything you like, and will probably work OK. Search here.

Just solder the bi-polar capacitor between the positive amplifier output and the the positive terminal of the tweeter. The the tweeter should be "fed" power through the capacitor.

Top Tip: Do not look directly at the capacitor when you power up you system. It may explode if you have chosen the wrong voltage or type (polarised or bi-polar). If you look the other way the bits won't go in your eyes.

Install a Low Pass Filter (also called a "Treble Blocker)


To make your low pass filter (induction coil) take around 2 to 3 meters of door bell wire, or other single cored insulated wire, and wrap is around your chunky steel or iron core. Leave enough spare wire poking out so you have enough to solder it to where it needs to go.

An Induction Coil - Very Techncial

Power needs to be fed to you bass speaker through this coil. So you wire one end to the positive supply from the amplifier and the other to the positive terminal of the speaker. (Scroll back up to the labeled picture to see how)

Conclusion

As mentioned this will not get you a top notch speaker, but it will make a horrible sounding speaker sound OK. 

By example, before installing these DIY crossover coils, I had to have the equaliser on my iphone on bass booster, and the sound was still too harsh.

After installing I can switch the EQ off, and they sound well balanced, I used an induction coil (low pass filter) taken from a professionally made speaker for the left hand side, and my DIY induction coil (low pass filter) on the right hand side. I cannot tell any difference by listening between the speakers. So the homemade one is working it would seem. 

For Reference - This is a professional made induction coil. Note PAM8610 amplifier bottom Right.

For reference I am using a PAM8610 to run this portable speaker, from 7 x AA batteries. The speakers were taken from some low quality active speakers. Also I should point out that you can get a pretty good bluetooth speaker for £30 / $50. So do not spend too much money on this unless you are doing it for fun!

Inside my DIY Portable Speaker


Environmental Permitting

Environmental Permit Applications