Tuesday, 21 November 2017

Shimano BR-BL-M355 Review

Shimano BR-BL-M355 Review - Intro


This is my second purchase of these brakes. I have one on the front of my cargo bike for around a year. It has been a good brake, so when my Avid BB7 on the rear of my normal bike got so stiff I couldn't adjust the pads any more, I thought I would upgrade to the BR-BL-M355. A newer budget offering from Shimano is the MT200, click link to read review. 

Basic but Neat

Shimano BR-BL-M355 Review - Build Quality


There is nothing fancy about this brake, but its does have the normal budget level of shimano quality about it. The finish is clean, the parts are well machined. I think the bleed nuts might be stainless. . .that sort of thing.
Quality Mouldings

This is a low end kit though, the brake lever is made from pressed steel plate rather than aluminium which you normally find on most breaks. But I like steel so thats cool.

Pressed Steel Lever. . Fine


Shimano BR-BL-M355 Review - Fitting


Fitting is a sinch. You have to remove your grips etc. to slide this thing on the bars, but that no big deal. Use hair spray squirted under grips (prise up a little with thin screwdriver or small allen key) to loosen them up and then more hair spray inside when you put them back on.

The brake are pre-bled, so it is literally the case of just attaching them to the bike, and hey presto done! Fit and forget.

Note Adjustment Screw for Reach


Shimano BR-BL-M355 Review - Performance


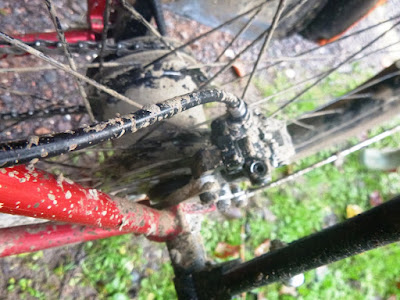
Mounted on the front of my cargo bike one of these will stop a very heavy bike on all but the steepest of hills. My cargo bike with me a 3 kids on it weighs 180kg, so thats not too shabby. On the flip side pulling this much weight to a standstill does munch the pads!

Calipers Lack. . which is good.

Performance in my experience is fine. If you want modulation or some sort of fancy braking then waste more money on "better" brakes.

Shimano BR-BL-M355 Review - Conclusion


Shimano Quality. Cheap as Chips. Stop you Well. . . . What else do you want? More bling . .shame on you! Spend the money on your wife.

Top View
Fin.

Environmental Permit Applications

Thursday, 9 November 2017

Vent Axia Lo-Carbon - Review & Install Guide

Vent Axia Lo-Carbon - Intro


For the most part the instructions give a good of idea how to install this thing. But the template that comes with the heat recovery fan is pants.


Vent Axia Lo-Carbon - Install Guide


There is one inadequacy with the instructions provided. That is the cable entry point, and also no description of how long the cable should be.

1 - The Cable Needs to be Long


The cable entry point (centre left of template) is around 15 - 20cm away from where you need to connect the cable internally (top left of unit). After leaving 10cm of cable sticking out of the wall, I was left short. Despite the requirement for a long cable there is very little room behind the unit for connectors etc. which makes adapting cable length with clamp type connector difficult.


 2 - Cable "Threading"


You also have to thread the cable through the body of the extractor fan. This would be relatively hard to do with 2.5mm cable. Bit probably OK with 1.5mm or flexible.


3 - Template 


There is nothing wrong with needing a long wire, but wire not mention this on the template!


4 - Run Off a Socket?

Yes you can run this off a socket. Handy if you want on and off to be timed. 


Vent Axia Lo-Carbon - Review

It seems to work OK, in terms of heat recovery. It is a bit noisy however. I used to ventilate my garden office with a couple of 120mm fans from a PC, which was better in terms of noise.

If I went again I would likley buy a passive MHRV unit for £99, some ducting and use PC fans again.

This vent axia lo carbon does have a boost function which shifts a lot of air, and also a summer bypass flap, so you can set it to just extract in the summer. 

Its a good bit of kit . . . . just a little too noisey. 

All the best,

dorkythorpy

Obviously this system could burn your house down if connected up incorrectly, and any cutting of wires will void any warranties. Do all of the above at your own risk. After all I have just written about what I am doing, it is your choice if you decide to do any of the above.


Environmental Consultants London

Monday, 6 November 2017

How to Install a Vented Tumble Drier

1- How to Install a Vented Tumble Drier - Intro


A condenser tumble drier is easy to install. Because you do not need a hole in the wall of your house. However with a vented tumble drier you need a pipe or duct that takes the warm moist air out of the tumble drier, and blows it outside.

2 -How to Install a Vented Tumble Drier - What Tools will You Need?


A professional would use a large diamond core bit, to make a perfect round hole. However this tool is not really worth buying for 1 job. Although they are about £20 on Ebay so not too bad.

Basic - Hammer and Masonry Chisel (It is be harder to do a neat job without a drill)

Intermediate - Drill with 120mm long masonry bit & Hammer and Chisel

Well Equipped - SDS Drill with chisel function

Pro - Diamond or Tungsten Core Bit

You will also need a tape measure, a marker pen and a vacuum cleaner is ideal for tidy up.

3 -How to Install a Vented Tumble Drier - What Materials?

A vent kit may be you cheapest option, and will likley come with instructions, so that could be a good bet if you are doing this for the first time, or not a keen DIYer.

If you are short of cash or need to get your drier up and running quickly, you could make the hole and pull the flexible duct through that is supplied with the direr, as a short term solution. Just make sure you allow the duct to hang downwards externally, so water will not run in.

You can also use a peice of 100mm waste pipe, and and a vent cover externally. This is what I used.

4 -How to Install a Vented Tumble Drier - Where to Make Your Hole?


Most tumble driers designed for domestic use will have a 100mm vent duct. Ideally you do not want you vent pipe to exit the wall any lower than 1 meter, to prevent rodents using it as a door. Realistically you will be limited to the the height of your kitchen worktop which is usually about 90cm. In short keep the vent hole a high as possible.

In the example shown below the drier is installed in a cupboard (door must be left open when in use) and the vent exits more than 1 meter above external ground level.

Important: The rigid duct should slop down hill towards the outside of the property. Otherwise the rain will run through the pipe in to you kitchen. Also condensation.

5 - How to Install a Vented Tumble Drier - Making the Hole 

A vent kit may be you cheapest option, and will likley come with instructions, so that could be a good bet if you are doing this for the first time, or not a keen DIYer.

It is better to start from inside, but you will need to have a think about where you hole will emerge on the outside of the house. Are there an pipes or cables in the wall? Is there a meter box (!) or similar close to where you hole will emerge?

Take a piece of you rigid ducting or in my case 100m waste pipe, and us it as a stencil, position the hole as discussed in section 5.

A - Draw Around your Chosen Ducting

Next take your drill and make a series of hole around the line the you have just drawn.

B - Drill A Series of Holes & Chisel Out

Now you will need to chisel out the bit of the wall you have made you holes around, it is better to chisel because it make less dust. When you have finished chiselling you should have the following. .


C - Remove Insulation
Once you have chiselled out your hole, your will likley see the insulation in the wall cavity, this can look like wool, polystyrene or it could be foil coated.

If it is wooly (as pictured) poke it out of the way. If polystyrene or foil backed foam, you will need to cut a circular piece. I did this from outside. I like working outside!


D - Check Holes Line Up

When you are looking through the hole, there is likley to be a strong draft blowing dust etc.through it. It will slow you down if you have any eye full of fibreglass so don't get too close. 

E - Install Ducting
Next tap through you rigid duct. It may not go through first time, you may nee to get the old hammer and chisel out again to remove extra bits of masonry before it will slide through. When it is flush / parallel with the wall on in the inside, mark the pipe flush with the wall on the outside, and then slide it out a bit to cut with a saw. 

The rigid duct is now installed, first go inside and slide you tumble drier in to position, you can then reach through the pipe from the outside and pull the flexible duct in to your rigid duct. Then install the vent extract external cover.

F - Install External Vent Cover

Comments appreciated good or bad.

Environmental Consultants London

Wednesday, 1 November 2017

Netgear WN3000RP Review

Netgear WN3000RP Review - Intro


There are a great many wifi range extenders on the market. If you are a fan of Netgear products (TP Link are a good alternative) then you may have come across the Netgear WN3000RP.

Summary: A good quality piece of equipment that performs well once setup, but let down by a very glitchy user interface.

Netgear WN3000RP Review - The Good


This small booster will work as a range booster or an access point. Quick explanation:

Booster: Picks up a wireless signal using aerials attached and fires it back out again at increased "strength".

Access Point: Allow access to a wired network. You could route a wired network through the WN3000RP so at to provide wireless access to that network.

I have used both features at two different houses and they work well . . .  once setup. The wireless access point I am running at the moment take ethernet from a powerline adaptor, and spews forth internet goodness in to our home.  This enable me to keep the router near the broadband source, and have an access point where we actually use wireless devices.

Because the WN3000RP allows access to our wider home network, it also allows us to use network printers and other back resources that are sited 100 meters from the house in my office.

The signal strength will pass through a 18" or 40cm thick stone wall. Although it is a little weak. In our old house which was built from concrete blocks the coverage was strong throughout the whole house.

Netgear WN3000RP Review - The Bad


Because the aerials are on the side it takes up too much room when using a multi-socket, so that is a bit annoying.

Netgear WN3000RP Review - The Ugly


The setup process is trying. In order to set this thing up you connect to it over wireless and then log in using the default password etc. As soon as you change any of the settings you are disconnected which you would expect. However, half the time when you do finally manage to re-connect you will find no progress has been made.

Choosing a SSID (Wireless Network Name) other then the one suggested creates all sorts of problems, so best avoided for you own sanity. All in all very frustrating. It could be that all range extenders are like this, it is the only one I have every had.


Environmental Consultants London