The pleasure of being outdoors is often spoiled by rain and cold weather. Those summer evenings when you sit and contemplate life over a glass of red wine, whilst listening to the birds and the wind in the trees start to become less frequent come late summer / early autumn.
We all love a good shed, or a hut, or a log cabin, but these generally disconnect you from the outdoors. Enter the hovel! A quick to build open sided "structure" enabling you to enjoy the outdoors even when cold and rainy.
A Bout 4 Hours to Build - Not Counting Stove
It is a nice place to go if you are an indoor worker. It is a "different" place to chill to signify a Friday. It is a bolt hole to escape from world pressures.
2 - Where to Build a Hovel?
Not in plain site, these are ugly shelters that will annoy most people. Of course you could make a pretty one, but then it would take on another name like a gazebo or something.
Something like this goes best in the corner of a garden partially obscured behind a large bush, or a short piece of fencing.
3 - How to Build a Hovel?
Build a shack or hovel with whatever you have to hand. You may need to buy some bits and bobs such as wood, plastic sheeting, screws. You also need a heat source, please see detail in Chapter 5.
4 - How I Built my Hovel?
I used a sheet of 8 x 4 ply, for a floor. You don't really need a floor, but it will keep your feet warmer in the winter. I used some willow staves for uprights, and cross pieces, and then screwed various corrugated sheeting off cuts on to three sides. I then stapled some woven polyester type material over one other side, leaving the front open. A plank of wood is used for a bench seat.
5 - Heating for your Hovel
Unless you live in Equatorial Guinea you will need a source of heat. I have made a chiminia type thing out of an old gas cylinder. There are lots of ideas for making a DIY wood stove, that you can follow, but most require welding.
However, mots towns have some one who can weld, you may live on the same street as a hobbiest that will weld for you, for a small fee. Ask around.
A balloon gas cylinder, and a few length of pipe is all you need. You could do the ducting you self with a hack saw blade, and then get someone to do the welding for you.
Ventilation ducting or steel down pipe make a cheap chimney. Because the sides of the hovel are open, air can circulate and so a few leaks may not matter too much, although wood smoke is full of carcinogens, and maybe CO1 so a good chimney is better.
6 - Video Tour of Hovel
7 - Conclusions
A fun project. Ask any question in comments please.
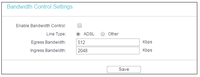
TL-MR6400 Firmware Update - For Bandwidth Monitoring / QoS Below is a chat string, in which I discovered that apparently you can update firmware to get bandwidth control.Note Sept 2019 : This was to "share out "the narrow bandwidth from 3G only data plan, you can now get unlimited 4G data plans with Vodafone, so I have swapped to that and no longer need to "share" bandwidth amongst devices. Jonil.A5:10 pmGood day to you! We will be glad to help you out with your inquiry.
KermitHi I have a TL-MR6400 and would like to throttle bandwidth in 3G/4G mode please. How do I do this. I have have version 2 firmware, which supports this in wirless only mode, does version 3 support in 3g 4g mode?
Jonil.AHello
Please let me check
for this model, once that you are using a sim card on it, it will automatically switch from 3G to 4G, it depend on the signal that the router is getting from the cellular Provider
KermitNo you misunderstand. I wish to throttle bandwidth. Reduce bandwidth. I have a 50GB 4G data plan, and it is used up too fast.
Jonil.AI see
so what you mean is the bandwidth control
KermitCorrect :-)
Jonil.AOne moment
on this router you can allow specific data allowance per month
KermitI have seen that. But I would like to limit bandwidth, I thin this is also called QoS on some products. Can I create a "rule" to do that if so how please.
Jonil.Afor this is doesn't have option for it
WillWhat about version 3 of the firmware?
Jonil.Ayou can't update to the hardware version
the only thing that upgradable is the firmware
KermitYes. I have version 2. If I used Version 3 does this have QoS or Bandwidth Control?
I havn't actually used any of the below, but I have assembled this list based on internet reviews, and intended to purchase the one I think is best. We have quiet a large garden so I need one that will last, and is lower end industrial grade, although upper end domestic may suffice.
I typically buy branded stuff.
Top 5 Garden Shredders - Hyundai HYCH7070E - £800
Catchy name. Thsi shredder is a petrol powered offering from well know manufacturer Hyundai, it has a 7hp engine and looks like it can kick bottom.
Top 5 Garden Shredders - The Handy PDS65 - £700
Another petrol beast. This employs a flail to mash feed material. I have used flails shredder before the have a tendency to get clogged because they cut in line with the grain of the wood producing long fibers which wrap around the cutting drum.
Top 5 Garden Shredders - BOSCH AXT 25TC - £400
This shredder gets good reviews and is also quiet. Bosch normally make pretty good stuff, so you could take reassurance from that.
Top 5 Garden Shredders - Makita UD2500 - £300
Perhaps similar quality to the Bosch, but less payout for name.
It cost a fortune to buy ready made passenger / grab handle for cargo bikes such as the Yuba Mundo or the Xtracycle. Why not make you own with some wood. Plywood is best. You will need a jigsaw and some sand paper, fabric tape optional. Some screws and a screwdriver.
A stiff wooden hand lke this is good, because it does not move around, unlike a rope loop or similar which is lousy for keep balance when the driver brakes.
Aim is to make a some rigid handle that kids or other passenger can hang on to to stop them falling off when you wizz around corners etc.
Simply cut out a shape, similar to above using a jigsaw. You could use a brad-saw, or even the saw on a swiss army knife if you are patient.
Attach the handle by screwing up through the base of the rear deck, use fairly long screws you want about 2" / 50mm of screw in the handle after it has gone through the deck. If you deck is plastic drill some pilot holes.
Done, sane done splintery edges, and then you could wind some tape around the grips. I used some cloth tape I had hanging around. Video on bike here.
This is a series of photos on the construction of a TPA3116 2.1 Channel Potable Speaker. The speaker uses wooden casing, up-cycled driver units, a 12v battery and can be adapted to run on main power also. If you would rather watch this on You Tube then please click here > TPA3116 Build Video
Finished Thing
TPA3116 is an amplifier, which runs on a variety of voltages. This "2.1" variant has stereo speaker out puts but also a third channel of sub-bass. This is my second build with this amplifier and it works well.
TPA3116 2.1 Speaker Build - Shopping List
For this project you will need the following. However, please do not be afraid to substitute materials, or even the amplifier board itself, for another model. For a smaller speaker you might try the PAM8610 which is a good little amplifier. For a very small speaker you might try the PAM8403.
I should also point out that if you are using recycled driver units, and they are still in the speaker case, why not re-use the case as well. You could glue, screw or bolts the two speaker together, and mount all wiring in side the speaker. This would avoid costs of buying wood.
For my speaker I used:
12mm Shuttering Ply - Main cabinet / box
9mm OSB (thin sheet wood - speaker grill support)
Screws
Two Part Filler
Paint (Optional)
Fabric or Cloth or Mesh
Amplifier Board
Speaker Cable
12V to 24V boost convertor
Switch
3.5mm jack cable
Driver Units
Insulation tape
Tools
Drill / Electric Screw Driver
Jig Saw
Tape Measure
Soldering Iron
Solder
Pencil
TPA3116 2.1 Speaker Build - Using Recycled Speakers
Making the box is perhaps the most demanding part of the whole project. As mentioned above perhaps re-use you speaker cabinets if you are recycling. I had some large sony speakers and the cabinets were fiar quality (not very weather proof though) and could have been bolted together, and used as is.
Most speakers will have 2 or 3 driver units inside.
Once you have removed the driver units from their original cabinet have a look on the rear of the speaker to try and figure out what ohm rating they have. For this project 4ohm speakers are best, but 8 ohm are OK, although the speaker will be quieter overall.
TPA3116 2.1 Speaker Build - Speaker Holes
You will need half a 4 x 8 sheet of ply to make this cabinet. Plywood is good, because you can get it wet, unlike MDF which swells when wet. Shuttering ply is a low garden water resistant ply, which can be sourced from most builders merchants.
Before you cut the panels, cut the holes for the speakers, it is easy to use a jig saw when the board is still in one piece.
Cut holes for driver units.
Try ou the driver units frequently to check fit.
Do not make the mistake of drawing around the driver unit and then cutting, the hole need to be large enough that the screw holes sit on the wood.
Mark past inner edge of screw hole.
Rest the driver unit where the hole is intended, then mark the very inner most edge of the screw hole. Do this for all the screw holes. Then take away the driver units and join up the marks to make a cut circle.
Cut Line Smaller than Full Diameter
TPA3116 2.1 Speaker Build - The Cabinet
Once you have cut your speaker holes (for mounting driver units) you can continue with the rest of the cabinet. The front panel of the cabinet is the deciding factor in term of measurements for the rest of the cabinet / box. Take care cutting this panel, to ensure it is square.
Taking Shape
Cut the sides the same size as the front panel. Cut the top and bottom the same BUT 24mm wider to account for overall. Always cut bigger if you are unsure. You can always cut off excess with the jig saw although this results in a messy finish.
Blood, Sweat . . . but no Tears
Once the cabinet is complete you can paint it, and add a front mesh cover. This could be stapled in place or glued, or anything really. Just have fun choosing what ever you have laying around and do it!
At 24V (max voltage) you are building a 40W amplifier. It is a class D amp, very efficient, so you get a lot of noise for those 40W RMS.
Hopefully your board came with a wiring diagram. This will show you which wire go in which clamps etc. Here I am running 2 x 8ohm speakers run paralleled to give 4 ohms.
Board Mounted on Steel Plate or Plastic Sheet Material
The board is supported using the 3 potentiometers, that control volume, treble, and bass. You could use the mounting holes also, but I find this unnecessary.
A 12V battery feeds a 12V to 24V boot converter. This is better than 2 x 12V batterys, as 2 x 12V batteries linked in series can be 28V fresh off charge which is too many volts! 24V is maximum.
The power switch on the side of you build, should switch the BOOSTER on and off.
Externally, cut a neat hole, and then drill holes in this for RCA Sockets, Volume Knobs and Toggle Switch. Finally, you can add two protruding bolts, that can be used to charge the battery without opening the cabinet up every-time.
Not all TPA3116 2.1 boards are made equal, if you are driving 8 ohm speakers get a board with high "gain" (36db) as this will help with output.
TPA3116 2.1 Speaker Build - Conclusions
On completion you will have a loud speaker that give very good low bass sound. The cost can be a bit high, but for me this was becuase of the wood. I bought a 4' x 8' of plywood, why cost £40. But I still have over half left. . . . the battery would also be a significant cost.
Total cost disregarding these would be £20, with the added bonus that you can fix it when it breaks. You built it after-all. Oh! Its pretty heavy.
If you would rather watch this on You Tube then please click here > TPA3116 Build Video