Friday, 7 January 2022

Thorpy's Guide to Lime Rendering for Beginners

Introduction

Most houses have very smooth interior wall surfaces provided by gypsum plaster. This typical pink plaster is a relatively high skill material to work with despite being in an out of building trade for 30 years, I prefer to leave it to specialists. 

Lime render or lime plaster is a sand and lime mix that is easy to work with, and although it does not give the perfectly smooth finish given by gypsum plaster, it has a charm of its own and I like using it, and the finish it provides.  

Lime Rendered Walls with a Slatted Ceiling

For an earthy build, with the right aesthetics lime render can fit very well, but it would likely look a bit odd in a "normal" house. In the above picture I have used a slatted ceiling with lime rendered walls. The two complement themselves rather well. Wooden window frames would have been a nice touch, but they were too expensive.

Fitness. I can cycle about 20 miles in one go over very hilly countryside.  Averaging around 10 miles an hour. . . .. . .  1 day of lime rendering (about 10m2) on my own (mixing, troweling, sponging) and I am dead to the world the next day. So it is best done as a shared job. It can also be a long job. . . . 

Mixing

. . . . .  based on an 0800 - 1700 day your last mix of the day should be about lunch time. Using the method described on this post, you will need 3 or 4 hours setting time before you can finish the work. A load mixed in the mid afternoon might be ready to sponge at 8pm - 9pm. For me that was after dinner! 

Mixing lime render is quite easy. Lime (Natural Hydraulic Lime) and sand (the sand will affect colour!) roughly 3 parts sand to 1 part lime. 

Be very careful not to get any lime in your eye. The worst thing you can get in your eye is a strong alkaline. And guess what; lime is a strong alkaline. If you do get some in I have found that sticking you head in a bucket of water and washing out eye, very very well works to stop any damage. Do not mess about walking to first aid post to get eye wash, or rubbing your eye with a wet towel. Wash out your eye very quickly and well, with tons of water. If irritation persists after washing (it never has for me) then go see a Doctor. 

It is worth keeping a large bucket of water handy for eye washing. My mother-in-law got some lime putty in her eye once, didn't wash it out very well, and the results were quite shocking. The white of her eye ball went bright red and lumpy. Its vicious stuff.  

The below video shows how to mix lime render. It is a warts and all video. The mixing does not have to be 100% precise. 

Put 0.5 bucket of water in a cement mixer. If you don't have one you can hire one. The only thing that goes in the mixer whilst it is switched on is the sand and lime. Do not put your hand inside, do not put your shovel inside. 

Next put in 3 shovels of sand, and a shovel of lime. The end result that you need is something resembling butter creme. It should be soft, and easy to work, but it should keep it shape quite well, when pushed around with a trowel. 

Put in more water or more sand and lime (keeping the ratio 3:1) until it looks right. 

When you are happy with the result tip the lime render in to a wheel barrow, and then scoop some out in to buckets. You then carry these buckets inside.

Tip the buckets on to a "spot" this is any old bit of flat wood. Left over floor boards or a 2ft square of board of any type is ideal. If you can put this "spot" on a table. . . or a stack of blocks it will save your back.

Putting it on the Wall

You will need a hawk and a plasterers trowel as a minimum to put the lime render on the wall. Lime render can be applied as one coat to a concrete block wall. If you are doing partition (wood or steel frame walls) then things might be more complicated. See partition walls for advice. 

Hold the hawk just below the edge of the "spot" and scrape some of the render on to it using the plasterers trowel. It is good to wear rubber gloves. 

If your hawk is aluminium you may notice that it starts to fizz after a while, as the lime render (strong alkaline) eats away at the metal. This serves as a handy reminder not to get any in your eye!


Most people recommend starting at the top of the wall. But to start with just slop it ion the wall, and see how you get on. Perhaps start in a less visible location, so that your first bit of render (likely the lumpiest) will be principally out of view.

Put 4 or 5 hawks worth of lime render on the wall. You will start to see where the lumps are. You can then go back over it. Scraping of high points and filling in low points. You can keep doing this for ages with lime render. Pushing scraping and adjusting until you are happy with the result. This is the beauty of lime render, its workability. 

Once you have it quite flat, then leave it for a few hours until it is firm to the touch. You will then give it a sponge. 

Sponge O'Clock

When you can push the lime render and it only leaves a very fine finger print, and requires a little effort to do so then it is ready to sponge. 

You can use a sponge (decorators sponge) or a sponge float. The latter requires a little more skill, but gives a flatter wall. A sponge float also requires quite a lot of strength to use. 
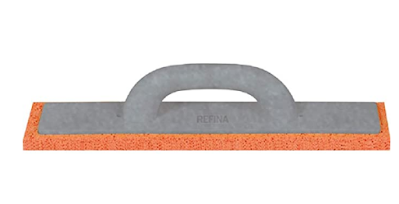
Refina Sponge Float

I use one of these and a decorators sponge together. You can use the sponge float first to flatten the render and then buff up and smooth little hollows so they blend in using the decorators sponge. Once you have finished sponging simply walk away and leave the render to cure, this will take a few weeks. 

Trust your own judgement, you know what you want you wall to look like. Stand back now and again to look at what you are doing. 

Undo

If at the end of the day you are unhappy with the result, take a shovel and scrape all of the lime render off of the wall. Have another go in a few days time. I did this once. It was a bit depressing, but it good to know you can just start again at any point. 

Partition Walls 

Lime render sticks very nicely to concrete block walls. But things are a little trickier when using stud partitioning. Initially I tried making "lathes" out of thin ply wood. But they were too bendy and it did not work very well. 

Secondly I tried thin plywood with lots and lots of holes drilled in it. This was OK. I think the problem was that I was trying to do everything in one coat (which is easy on concrete blocks), but not so easy on any type of plywood. 


I would recommend using thin plywood, with holes drilled in it . .  ort thin plywood with a sheet of EML over the top. I would then put a thin coat of lime render over this using a notch trowel. Leave it for a few weeks, and then put the top coat on. I did n't have time to do it this way, as I had to get back to my real job. 

Corners

Typically one would use angle bead for corners when gypsum plastering. But lime render is so workable you can use a corner towel if you like. It is hard to get the corners dead straights, but they will look reasonably pleasing when down. 


I used a rounded corner trowel for all corners around windows and else where, and found by the end I found it quite easy. 

Colours

There is nothing stopping you from lime washing the rendered wall when it is finshed. You can get natural pigments and mix them with lime and water to make a creamy lime wash, which you then paint on to walls. 

You can use a roller if you like, but the result will be different to a brush. This is very messy and the pigments will stain your floor boards so put down some sheet. 

Keep that bucket of water handy for eye washing. 

In my honest opinion the lime render is best left naked. It almost feels like you are sitting in nature. I used a yellow building sand which results in a beige colour when mixed with white lime. But you can change the lime colour, and the sand colour to give different affects!

Cost

If you can do the work yourself you can expect a very cost effective result. Materials and tools to render 80 m2 of walls cost me around £300. A plaster might charge £300 to plaster 1 small room. 


Preliminary Ecological Appraisal 

Flood Risk Assessment London


Thursday, 25 November 2021

LPG vs Economy 7

LPG vs Economy 7 

Below quick comparison of  costs for LPG and Economy 7 Electricity. The comparison is based on a KW/h of energy from both sources. I have not factors in efficiency of end use. 

Economy 7

We get our electricity from Ecotricity. Their economy 7 rate is 13.32p/KWh. 

LPG

We get our LPG from FloGas. They charge 68.00p per litre. 

1 litre of LPG weighs 0.51kg.

1kg of propane = 14.019 kWh

Price therefore approx 7.14p/KWh

Discussion 

You could add 10% on to the cost of LPG, as even a very efficient boiler is not 100% efficient. 

However, it is likely that any use of economy 7 energy will require some form of storage:

  • Thermal Store
  • Power Wall (Battery)
  • Storage Heater
These will "leak" heat in to the home / office when it is not needed (at night) and as such there are some losses to consider there. 

So for heating Economy 7 will be more expensive than LPG. 

For appliances with delayed timers such as dishwashers, or washing machines any loads you can delay so they fall within the off-peak period, will make a saving. 


Sequential Test

Wednesday, 3 November 2021

Schwalbe Pick-Up Tyre Review

 Schwalbe Pick-Up Tyre Review 

Hello happy humans. Despite already having way too many bicycle tyres I just bought some more. I think I may have a problem. Lots of photos here, and video below if you would rather:


In my quest for a high volume tyre with reasonable rolling resistance, and excellent puncture protection. I have gone for a pair of these Schwale Pick-Up Tyres in 26 x 2.35 size. 559-60 in euro sizing. 


Th tread pattern is quite smooth centre knobs, with textured shoulder knobs. The knobs themselves are quite shallow so tyre hum is not overly evident when riding on roads.


I have owned around 10 sets of schwalbe tyre over the years and they have all had very good moulding quality, they have (with one exception) all run straight with no wobbles or such like. 


These tire were measured quite thin compared to their advertised size. This is a bit annoying as I quite wanted them to be the size that is printed on the side of the tyre (60mm) but they are in fact 56mm, on 25mm rims. Had similar trouble with Super Moto-X tires. 


Fine with mudguards shown here with SKS bluemels P65s. 


I use these tyres for out and about country riding, on gravel tracks, roads, and light offroad. The main reason I went for these tyres is the "super defence" puncture guard. I am not a huge fan of "green guard" as it affects the feel of tire. 


Schwalbe (c) Owned image of super defence. Which looks like a double thick carcass. This also gives the tyre a very very firm feel when riding. Not firm as in hard, but firm as in reassuring. I should imagine (i am guessing) the structure of this tire is more similar to automotive tyres. 


More pictures of tread. The side knobs / texturing are quite good when riding in wheel ruts. The big apple tyre in particularly slips very easily when trying to get out of a wheel rut ion a track for example, as it has very little shoulder grip. 


More pictures of tread. . . . 
. . . and more.. . . .  

The tire has various markings and the side, and a reflective sidewall. The tire indicates it is e-bike ready. 


The tyre is made from Addix-E compound: "The newly created Addix E-Compound is specially optimized for maximum durability, low rolling resistance and exceptional grip even at high speed." This tyre shown is 2.35" version but you can get 2.15" in most versions. 


The tyre will go up to 4.5bar which is quite high for a wide tyre. 


Errrrr . . .  I like the colour of the writing. . . 


So hopefully many many more hassle free rides to come. With hopefully not many puncture. Or I will be going back to big apples. In summary these are a really nice tyre, but better if they had been measured properly.  

Update 09/12/2021: I have ridden this now for about 200 miles. It is not as light to pedal as the biggle apple, but is is better than I expected. It certainly rolls better than the super-moto-x. However, I have found that I cannot inflate to full pressure and still enjoy the ride. 4.5 bar on a tire of this width is crazy hard. It makes ride too uncomfortable.

Update 20/01/2023

Below are some pictures of the Schwalbe Pick Up Tire Mounted on a cargo bike, I hired in the Netherlands. I suppose this is what they were built for. We did about 100 miles in 3 or 4 days. I think I would have pumped them up a bit harder, but I had no pump (ergo pressure gauge) to check what pressure they were running at. 

The front tire os 20" size. I don't really have much to say about that. I couldn't see it from where I was sitting. 
As you can see I was carrying all of the families luggage, and for some stretch, my son sat on the rear rack and we put his small bike on the front. So we really loaded these tires up and they were very well behaved. 

Wednesday, 20 January 2021

New Jabra BT2045 Review

Intro

The New Jabra BT2045, is a small, light, inexpensive BT ear piece, that enables you to talk on you bluetooth phone handsfree. I bought mine for £16 delivered from eBay. 

Features


The Jabra BT2045 has the following features:

  • Echo Cancellation, 
  • HD Voice, 
  • Noise Cancellation, 
  • Noise Isolation
  • Talk Time: Up to 8 hours
  • Standby Time: Up to 240 hour
  • USB Charging: Yes

Real World Battery

Whilst I have not used ear piece for 8 hour talk time, I can safely say it will not last 10 days on stand-by as I have left it switched on over night (not in use) and battery is dead by morning.

Controls


Part of the reason I often leave this switched on is the button is quite small, and hard to operate with podgy fingers. The indicator light is also obscured by your finger when you are trying to operate the button, so you can not see any of the flashes of lights colour changes. 


Comfort 

Despite not "looking" very comfy. The ear piece is so light and small that it is actually very comfy. I have worn it for a few hours at a time listening to audio books, and my ear does not get sore.

The ear hoops is also detachable, and the in ear bud will wedge in you ear quite well, enabling you to use the earpiece without the hoop, if your ear is the right shape!

Call Quality

The sound coming from the small in ear bud, is free from bass but that is quite good for clarity when talking to people. 

The volume could do with being a bit louder, but is pretty good even in windy conditions (for listening), however in wind the microphone (and associated noise cancellation etc.) does struggle a bit, but that is the same all round I think.

Conclusions

The volume could do with being 20% louder. But apart from that the Jabra BT2045 is a good no frills option. 

Sequential Test


Tuesday, 19 January 2021

Mud Guards for Tag Along Bike

Intro

My youngest child (boy) has recently come to the age where he can go on a tag along bike. Living in rural england, there is mud everywhere for 90% of the year, and our first trip out was cut short owing sogginess and mud splattering. 

I am quite practiced at bodging together DIY mudguards (fenders is in USA) for various bikes, but fitting effective mudguards (fenders) on this tag along has proved a laborious affair!

The problem being that as well as the normal rear wheel splatter problem, you also have a unique "front wheel" splatter problem for the tag along rider, as they are low down and in the line of fire from your rear wheel splatter.


So the rear rider will get wet and muddy very quickly if no mud guards are provided. This can be fun in the summer, but in the winter it is a bit much to ask perhaps. 

Tag Along Wheel Splatter

The easiest problem to deal with is the splatter from the wheel of the tag along bike. Which you would treat as any rear wheel, on any bike. You could buy a set of 20" mudguards and discard the front one, and that would do the trick no problem. 

In my case I used my favourite "trick" of installing a rack (£10) and then zip tieing some plastic board to it. Zip ties are cheap, and the plastic is always free. Plus you get a rear rack, and loads of clearance around the wheel. 

Main Bike Rear Wheel Splatter

This is quite difficult to deal with. The best answer would be to fit a flap on the rear mudguard of the main bike. The flap can be made from allsorts of things, I have done a post on DIY mudflaps some years ago. 

Simply Zip Tie Some Type of Plastic on to Under Side of Rack


As the image below shows the splatter not only flies off in the conventional manner, but also is blown backwards by head winds, meaning that is can "bend" around mudguards fitted on the "down tube" of the tag along. This was happening alot even through I have a a full set of mudguards on my main bike. 

Head Wind Blows Vertical Splatter Back on to Passengers

The answer here as hinted above is to add a flap to the rear mudguard of the main bike. The closer you can get to the ground the better. 

Create  Flap on Your Rear Mudguard to Prevent Splatter 

My initial thought was to use a crud catcher type guard on down tube of tag along, but this would have to be very long, and would need some sort of flap to catch low flying splatter. Better to install a flap on the main bikes rear wheel, and deal with the problem at source. 

Close but Not Quite There

So whilst my tag along wheel guard worked fin, I need to manage splatter from main bike's rear wheel a lot better. I will use a flap.


Sequential Test

Preliminary Ecological Appraisal 
construction environmental management plan

Friday, 15 January 2021

"Something Went Wrong" - Teams Assignment Attachements

Intro

I hope this helps someone. We have 3 kids at home using teams for education during lock down. And this problem has caused a lot if upsets. 


When my kids try to access their assignment reference material through the teams web app. We get a message saying "oops something went wrong", in some instances people see "doh something went wrong" or other over familiar trite snippets. 

Not only does this problem prevent my kids seeing there school work it also means, they can't hand it in easily. 

"Oops Something Went Wrong"  - Tell me something I don't know. 

I will start with the rather disappointing conclusion that you will not be able to use teams web app or even the desktop app, to access you assignment attachments if you are using Windows 7

We have 6 windows laptops and PCs in or house that run on Windows 7. In 2021 I guess this is rarity, but seems to be the main problem. 

Either by design or by accident there is a bit of code in windows 7 somewhere that means teams is not fully compatible. 

I have tried so many different fixes, to get assignments attachments open in teams, but with no luck. But using our 1 windows 10 laptop. The problem is not present.

I have tried firewall rules on router and windows, asked school to check permissions for access. We have tried web app on chrome and edge browsers. 

We have tried web app and desktop app (the one you download and install on PC / laptop). 

iOS 

Teams App on iOS works absolutely fine. Same account same permissions, same operator ame everything. 

Windows 10 

Problem is not present. . . . 


Work Around - 1 


The best work around we have found is to remember the assignment reference material file name (or part of it), and then navigate to office 365 home page, there go in to sharepoint and search for the attachment. It will open from there. 

You or your child can then edit the document and share it with the correct teacher using the share button (on the document ribbon). 

Work Around  - 2 

Use your iOS device (iphone) to share the assignment reference material to a chat. That you have access too. Perhaps set up a chat between you and your teacher only, so you can share documents to the chat and you teacher can check them. 

Environmental Permit Applications

Ocean Plastic Gifts

Tuesday, 12 January 2021

Soundboks 2 - 2021 Review

Soundboks 2 - 2021 Review - Intro

I have long gazed at the Soundboks 2, wishing it were mine. And after a year of enforced saving (COVID) I have treated myself to a Soundboks 2 Speaker. 

At the time of purchase there was a choice between getting the Soundboks 2 and the "New Soundboks", the Soundboks 3 (?).

However, after watching lots of reviews on YouTube, I decided on the Soundboks 2. The main reasons was I liked the sound better, the secondary reason was that was £300 cheaper . . . .


I watched the above video and, the Soundboks 2, to my ears sounded better. Less harsh I thought. I like a soft mellow bass rich sound, a bit like the kind of sound you would get from an old school valve amplifier. 

Soundboks 2 - 2021 Review - Finding

My Soundboks 2 arrived in early December. I was patient and waited until Christmas Day to open it. The sound was very pleasing at low to moderate volumes, but become harsh at higher volumes. 

In my opinion the bass / treble balance is lost at higher volumes, and the tweeter become jangly and unpleasant at higher volumes also. 

Don't get me wrong it is a great speaker, very well built and the battery lasts for ages (days) for normal listening. It will also likely out last me, and be handed down to my kids it is so well built. 

The switches and the build of the casing is bomb proof. I love that. 

Soundboks 2 - 2021 Review - Context

So you might ask what speaker am I comparing this to? Well it is a home made one, that I have "perfected" over the last few years.

I like to dance to music that is bass heavy, and I like to feel the bass whilst still not hurting my ears, with over inflated treble and mid range. 

The specs of my home made speaker are as follows:

  • TPA3116 2.1 
  • 24V Power Supply
  • 12mm exterior plywood cabinet.
  • Salvaged 8 ohm speaker drivers and tweeter complete with original crossovers.
  • JBL 2 ohm 10" sub woofer
After a few weeks of listening I can safely say that I prefer the sound from my home made speaker. It quieter in treble and mid range, but still pack mega punch in the bass area. 

I will post a youtube video, with comparison soon:

VIDEO


Ocean Plastic Gifts

Sequential Test

Scientific Web Content