Tuesday, 25 June 2019

DIY Mountain Bike / MTB Mudguards / Fenders

DIY Mountain Bike / MTB Mudguards / Fenders - Intro


I was a little pissed at the thought of having to spend £7 on a piece of plastic, which is literally no bigger than the lid off an ice cream tub.

But here's the thing, why not buy a tub of ice cream, eat it,  and use the plastic there in to make a set of DIY mountain bike / MTB mudguards.

This design of front mudguard is a far sturdier mudguard than the zip tie offerings, and unlike the down tube style guards has the advantage of moving with the wheel when you turn around a corner.

The rear option sees you spending money on a rear luggage rack, which weighs next to nothing and using that as a mount point for salvaged plastic. A rear rack is so so handy. If you don't like handy and prefer trendy then you are reading the wrong blog.


DIY Mountain Bike / MTB Mudguards / Fenders - Ingredients


It doesn't have to be ice cream, just keep an eye out for a any sort of suitable plastic, and lets face it we are drowning in the stuff, it needs to be quite thick and rigid. The sort of plastic you might get from a 25 litre container of something (cooking oil?), or the lid off a 10 litre paint tub that sort of thing. Nearly all of the below you could probably find lying around.

Hint: Before you throw stuff away start taking it apart and keeping the nuts, bolts and screws, as they come in handy.

  • Snips or Jig Saw
  • Strip of Steel
  • Drill Bits
  • Rivets or Small Nuts and Bolts
  • Plastic (HDPE Preferentially - Number 4 Plastic)
  • Star Nut Sized to Stem
  • Zip Ties
Now right about now, you might think that £7 doesn't sound so good, if you don't have this stuff already then, the outlay may not be worth it, although it will set you up for future projects. You could do this in a community work shop


DIY Mountain Bike / MTB Mudguards / Fenders - DIY Front Mudguard

For the front mudguard will need a piece of plastic around 30cm long and  10cm wide. You cut this in the shape of a podgy wine bottle. You then place a 10cm length of strip steel, or hammered flat steel tube, over the thin under an rivet in to place. Finally you drill an 6mm hole in the end of the strip about 2cm from the outside end.


Hammer a stat nut in to lower end of your fork steerer tube. You then bolt the front mudguard to the underside of the steerer tube. Done.


DIY Mountain Bike / MTB Mudguards  / Fenders - DIY Rear Mudguard

At this point you might be thinking you don't want a rear luggage rack. . .  


But you soooo do want one: You can get a rear luggage rack on eBay for £10 with postage (which is less than some mudguards). This opens up all-sorts of options, for off-road touring etc. If you are thinking bike packing, well you can still strap trendy bags to it, that would otherwise be mounted further up under the saddle, where they will raise you centre of gravity. For practical types, you can add a pannier to store water, food, and clothing. I recently did a stretch of the south downs way (off-road) carrying 2 litres of water, lunch, clothing and tools, in a pannier it worked a charm, I can swap the same bag on to any of my other bikes, in 5 seconds. 

Any hoo. 


Simple cut a piece of plastic the same width as you rack's underside and secure with zip ties. I you had a long enough piece you could extend this down to the chain stays, but I have found the the piece jutting out at the back as shown in images is fine. 


Monday, 24 June 2019

Shimano ALTUS 9-speed Shift Lever SL-M2000

Shimano ALTUS 9-speed Shift Lever SL-M2000 

I have recently purchased this ALTUS 9-speed Shift Lever SL-M2000 shift leaver. I have fitted to a bike with a shimano XT rear mech.

The shifter is very light, likely owing to a lot of plastic components, it have a slightly hollow plastic feel in operation, that being said the action is light and accurate, and it does exactly of what you would expect of it.  

 
The indexing can be adjusted from the lever using the built in cable adjuster, this is essential for any of shimano shadow mechs, as they can not be adjusted at the mech.

Would I buy again? - Yes

Better than I thought? - Yes

Good Value? - Yes

I own various other shimnao shifters (alfine, LX, tourney .etc.) and they are all of comparable quality. I do have a saint shifter, but that cot 6 times the amount and is probably twice as "good".

Scientific Web Content


Sunlight and Daylight Assessment

Wednesday, 19 June 2019

Choosing Tyres for the South Downs Way

Choosing Tyres for the South Downs Way


The below paragraphs will hopefully help you choose the correct tyre of the south downs way, the guide could also apply to other long distance off road tour routes, if the surfaces are similar.

If the weather is bone dry then you would want different tyres, than if it were wet. Some talk of flints of doom, but I didn't see any of that. I rode for 9 hours in total with no punctures, and after careful inspection of the tyres after by returns there were not cuts or gashes. 

A Word on Flints

Flints are a rock made out of glass (Silicon Dioxide) if they are broken in the right way, they can be used to make razor sharp cutting tools. Vast sections of the South Downs Way are covered in Flints. But that does not mean they will constantly be puncturing you tyres. A few years ago I sustained the below damage to a tyre and the inner tube popped out.


It was caused by the below flint that way stuck in the ground very securely with the sharp edge sticking out of the ground. It was a perfectly broken flint, held in a perfect position. Very unlikely to happen.


Now I have only ever had this happen once in 10 years of cycling. And the problem was quickly got around by cutting up my old inner tube and laying over the inside of the tear before inserting a new inner tube, and limping home. A better option might be to carry a piece of tyre side wall in your repair kit, and even a tube of super glue.

The fact here is that you could run some serious rubber to protect against this freak occurrence ,and it may never happen. Better to take a repair kit to cover the slim chance of it actually happening. A small pair of scissors will see you through. You can chop up the damaged inner tube, lay it in tyre 4 deep, in playing card sized pieces and it will hold the new tube in.

Tricks

Things to watch out for:
  • Green Chalk - Algae covered chalk which is very slick.
  • Cycling on Side Slope - Expose side walls to sharp flints. 
 

The side slope as described is typically found in long sections of wheel rut, so cycle on the centre ridge or off to one side if there is an option to do that.

South Downs Way Surfaces


I have included a selection of pictures below so you can make you own mind up. There were some farm track muddy sections, flinty paths, mud / flint paths, cobble farm tracks, tarmac, concrete, smooth-ish, compacted aggregate, and grass. It is a smorgasbord of surface dressings.


When belting down Beacon Hill, near East Harting you might want you knobbly tyres. Wet grass is very slippery. And I would be very nervous about going down this hill on slick tyres.


The flinty decent from Bignor Hill is fine with any type of tyre, in wet or dry conditions. The flints are grippy.


Heading up the gentle incline west past Glatting Beacon, grass again so low profile knobbles would be useful if wet. 


The mud covered flint path ways of Graffham Down, you would probably be OK on slicks as they would bite down through mud.


 Narrow side paths of Heysott Down probably want some knobbles for that . . . . .


Another downhill grassy slope, glatting beacon would be to the left in this shot.


An image borrowed from the Petersfield Post.  I doubt it would be possible to pedal up that hill without some fairly serious mud tyres. 

So if nothing else we can see that surfaces are varied. If you are racing or doing a very long stint in one day, then hope for dry weather and run something semi slick, perhaps even full slick. The care you have to take on grassy, muddy bits will likely be paid back double when you get on the tarmac or hard pack. 

If you are not racing or doing more than 30 miles a day then go for some knobbles, then you can enjoy the fun bits in the knowledge that you have good traction. Look for tyres with following attributes:

  • Low Profile (but not slick) Centre Tread
  • Good Side Lugs
  • Puncture Protection
  • Side Wall Protection
  • Thickness of 2" or More
  • Size of 26" or More
  • Good Load Rating if Carrying Luggage
This would lead me to recommend the following tyres, these are all based on 26" 559 sizing. Most are available in 27.5 / 650b also.

When Wet 

You may wish to try the below after a prolonged period of wet weather.  Don't go mad with the knobbles, but you will need some.

For Wet

When Damp

Unless there has been a prolonged period of dry weather, then I would suggest using something with side lugs. 
For Damp
When Dry (as a bone)

If the weather has been dry for a couple weeks, then you might optimise your performance with some of these slicker tyres. 

For Dry
Sorry they are all Schwalbe, but you know you can get an idea of tread levels.

BUT I here you say what did you use? Well despite owning a pair of £80 Marathon Mondial, which are a very well made tyre, I ran a pair of £15 a pair Impac Trailpac Tyres, and they were fine.

Ultimate Conclusion


Just remember you can do the South Downs Way on any tyre you like. If the worst comes to the worst you can always get off and push. The main thing is to just get on a do it! It is a great route.

Illustrator Devon

Energy Strategy

Waste Transfer Station Permit


Tuesday, 11 June 2019

DEORE Rear Hub FH-M6000 Review

DEORE Rear Hub FH-M6000 Review 


Another component added to be wheel rebuild. This is a solid offering, nothing fancy which I chose based on its pitch circle diameter. The bearing are smooth, the finish is excellent. The hub has mounting for centre lock disc brake, upon which I fitted a Shimano SM-RT30 Center-Lock Disc Rotor.


So if you need a rear hub with 9mm QR, and centre lock, which has a similar pitch circle to many older hubs you may which to replace then go ahead an buy this you will not be disappointed. This hub is a direct replacement for a FH-RM30.

Scientific Web Content


ESDM Report

Shimano Hub Dynamo DH3D32 Review

Shimano Hub Dynamo DH3D32 Review


This Shimano Hub Dynamo DH3D32 is the cheapest hub dynamo I could find that is suitable for disc brakes.  It is your typical Shimano offering i.e. perfect.  This is a 6 bolt version but there is also a centre lock version.


The  DH3D32 has the standard Shimano connector which is easy to install, although the stripped wires need to be just the right length.


The DH3D32 dynamo will illuminate the front light at a fast walking pace. It is advisable to buy a light with a stand light, this not only stays on whilst you are stopped, but smooths the flicker which nearly all dynohubs create when using a lamp without a standlight.

If you are currently using rim breaks why not buy this anyway, it will have a higher resale value, and allow for easy future upgrades.

Update: 2024 have just moved this on to another building, and is still going strong. Using it with a Busch and Muller Cyo 80 Lux. Perfect. 

Suntour NEX E25 - Review & Service

Suntour NEX E25 - Review & Service - Intro


 Suntour NEX E25 suspension forks are a suspension fork especially designed for use on e-bikes, presumably the 25kmh standard. I am not using these on an ebike. The forks are more heavily make to account perhaps for:

  • A heavier bike
  • a heavier rider
  • harder braking  
The forks have the following dimensions:

  • Tire Clearance - 54mm
  • Axle to Crown - 738mm
  • Stanchion size - 30mm 

Suntour NEX E25 - Updates

Update 2024. These have spent the last 3 years on a shelf, but recently I rebuilt them in to an ebike, and welded and extra length of steerer on to them to get up to about 400mm. I have also made so boots, to cover the exposed stations, and stop mud going on the silver bits. These boots used to be common pace on older forks but they got rid of them about 20 years ago because they don't look cool. 

Suntour NEX E25 - Review & Service - Use


The are suitable for "casual off road and paved road use".  I have used them off-road over very bumpy stuff, and I way 90kg / 15 stone.

I should note that prior to trying this fork, I was using the CR-8, a low end fork, even compared to this NEX E25 Fork which is worlds better.


These forks are slightly stiffer sprung, requiring less turns of the pre-load adjustment to make them good for riding. The lock out is a good feature.

Perhaps the most notable addition is damping, which stops the front of bike bouncing back up when you go over a hard bump.

I have ridden just 4 or 5 miles of off road on these forks, they do the job, thats all I can say.

The lock out is handy if you are stand up pedalling up a hill, but other then that I leave the forks unlocked.


Suntour NEX E25 - Review & Service - Guts


The specs from the suntour website give all manner of variations on these forks. In fact even afetr careful study I am not sure what model I have.

If you are not sure what you have best to head over the suntour website and look at the exploded views. Fairly sure this model below is what I have, but there are 4 other models some without lockout, and some with two coils.

Flood Risk Reports

Environmental Permit Applications 

Unlike the CR-8 this fork has damping which is a good feature to have! Even just for the 28" variants there are the follow models to wade through:

  •  SF17-NEX-E25-DS-15QLC32-700C-50,63-(2).pdf
  • SF17-NEX-E25-DS-HLO-15QLC32-700C-63-(2).pdf
  • SF17-NEX-E25-DS-LO-15QLC32-700C-50,63-(2).pdf
  • SF15-NEX-E25-DS-700-50,63-(1).pdf
  • SF15-NEX-E25-DS-HLO-700-50,63-(1).pdf
  • SF15-NEX-E25-DS-HLO-700C-63-CTS.pdf
  • SF14-NEX-E25-P-700-50,63-(2).pdf
  • SF14-NEX-E25-P-HLO-700-50,63-(1).pdf

Suntour NEX E25 - Review & Service - Conclusion

In conclusion these are a great set of forks, which I purchased for £30 from discount bikes de,  their retail price is about £70 at which point you could probably find any number of forks to choose from, of a similar or better specification.

Suntour NEX E25 - Service & Strip Down

After about 6 months, and not much ride time the travel on these forks became much reduced. This was most annoying, and so I took them apart, dried the insides and greased them up. They worked like new when I put them back together. So that is good to know! I will talk you through process below. 


1 - First off  you need to remove brake caliper from fork. I also had to remove dynamo cable. This is so you can slide the leg (green bits in this picture) off of the stanchions (silver bits).


2 - Then undo the nuts on the bottoms of the fork legs. Both nuts. 


2.1 - These nuts come off like this  . . . . 


1.1 - We already mentioned taking the brake caliper off!


3 - Then you give the legs a good hard pull (perhaps stand on handle bars) and they will come off. 

4 - Use a rag and a pokey thing (stick) to dry out and remove old grease from inside legs, wipe off all old grease from stanchions. Then re-grease everything and reassemble. Engaging the lock out switch will make it easier to get the left hand (in this picture) nut back on. 

Works a treat. Happy tinkering!


Monday, 3 June 2019

Shimano SM-RT30 Center-Lock Disc Rotor Review

Shimano SM-RT30 Center-Lock Disc Rotor Review


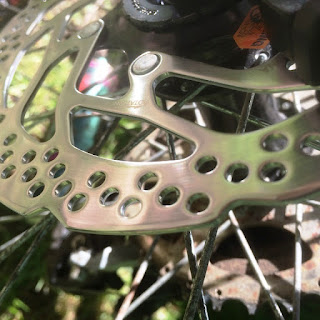
I doubt many would bother to review such a humble piece of equipment as the SM-RT30 Center-Lock Disc Rotor , and I can hardly be bothered but here we are any way!

Update 2022: This rotor has lasted about 3 years. I am a heavy guy, and live in a hilly area. I probably use rear brake more than front. 

The SM-RT30 Center-Lock Disc Rotor is a disc rotor aimed at low end touring or beginners use, but inline with current engineering standards is over engineered to the point where it could be used by just about anyone for any purpose.

I have another low end shimano disc rotor I have been using for 4 years and it has been very good.


These discs I think are made by pressing or punching them from a sheet of steel alloy, as such these have a slightly rounded edge. If you buy a more expensive disc rotor they will have a machined surface. For the type of riding I do I notice no difference what so ever.


These discs are centre lock which means you will need to use the tool that you use to fit your cassette in order to screw in the locking ring, as illustrated below. The exception is when fitting these on to a hub with a nutted axle (Alfine for example) rather then a quick release axle, as most of these tools have a guide spindle that will get in the way when attaching to a nutted axle.

In conclusion I am happy (again) with my purchase and all is well. I would recommend these to anybody from old ladies to downhill racers.

Environmental Consultants

Flood Risk Reports

Shimano MT200 Hydraulic Disc Brake Review & Install

Shimano MT200 Hydraulic Disc Brake - Intro


Search the for a set of hydraulic disk brakes, sort by price and at the top of the page you will likely see  the MT200 Hydraulic Disk Brake. They're very cheap especially if order direct from the far east. I paid £35 ($60) for my front and back set with rotors!

On the Shimano website these MT200 Hydraulic Disc Brakes are described as "Altus" which is a low end offering, but with Shimano reliability. I am steel using a 20 year old Shimano Altus chainset  on one of my bikes.

This is not my first set of budget Shimano disc brakes I have a number of  Shimano M355 Brakes which I have found very good. These MT200 Brakes and the M355 also take the same pads BS01, which is a major advantage in my book.

So I clicked buy, waited for about a week, and I will now share my findings. 

Shimano MT200 Hydraulic Disc Brake - Build Quality


Excellent when considering price. The moulding and the all sub-components are very neat and all edges are smooth and free from burs or any other machining defects.

The lever blade is made from a pressed steel, but this has been done is a way that results in a very comfy finger area (if that's a thing).


The brakes do not feel cheap or shoddy in any way they. Perhaps the one part that looks a bit odd is plastic cap that fits on to the inboard end of the lever housing. Bearing in mind the whole system has to contain considerable pressures, this large plastic section looks as though it could be considered a weakness, but I am quite happy to put my faith in the designers, I doubt it is a weakness it just looks like one.This plastic cap is fitted in SLX, Deore and XT brake levers so it must be well thought out.

Shimano MT200 Hydraulic Disc Brake -Fitting

Fitting is a cinch. You have to remove your grips etc. to slide this thing on the bars, but that no big deal. Use hair spray squirted under grips (prise up a little with thin screwdriver or small allen key) to loosen them up and then more hair spray inside when you put them back on.

The brake are pre-bled, so it is literally the case of just attaching them to the bike, and hey presto done! Fit and forget.


NOTE: When buying a set of MT200 be sure to get the right back and front lever combo. These brakes arrived with a Rear Right Hand / Front Left Hand suitable for the USA and most of Europe, whilst i wanted Front Right Hand/ Rear Left hand is is customary in the UK and Italy. 

I did think about buying a bleed kit, prior to swapping the hoses over. As it turns out I simply unbottled them swapped them around did them up with a spanner, and they worked perfectly without any further faffing. 


Shimano MT200 Hydraulic Disc Brake - Performance

Perfect. 

These MT200 brakes work as well as my M355 brakes other then that, I cannot comment. I have used by M355 brakes on a very large cargo bike, which can stop 200kg of bike, rider and children without issue.


Shimano MT200 Hydraulic Disc Brake - Features 


Below list is taken direct from sales literature:

  • Versatile design matches numerous bike styles
  • Less pad rattling noise
  • Braking power adjusted for entry level riders
  • Accessible lever reach designed for small hands - Note: Or big hands!
  • Easy, quick and clean installation
  • SHIMANO Hydraulic Disc Brake performance
  • Reliable braking performance with less noise

Shimano MT200 Hydraulic Disc Brake - Conclusions 

It is a perfectly good brake, and will no doubt give years of satisfactory service. The design follows features found in much higher priced models such as XT and SLX, and to be delivered even a sniff of that pedigree for £35 a set is fantastic.