Wednesday, 16 September 2020

Laggy Slow Rendering PDF - Problem & Fix

For work I often view PDF drawings exported or printed from AutoCAD, some have 100's of layers, others are quite simple. Some are Laggy Slow Rendering PDF, where layers of CAD drawing appear very slowly after one another, and as the pdf is regenerated as you zoom or scroll you have to wait all over again. 


I have notice over the last few years that some of the more complex drawings are very slow to render, the display of the PDF layers is laggy, and when zoomed in panning around the document this can be quite annoying. 

PC Specs are old, but heavy duty:

  • HP XW8400
  • 2 x CPU (2 x xeon 5160) 4 Cores in Total
  • 2 x Nvidia NVS 300 1GB 
  • Samsung EVO SSD
  • 16 GB of RAM
Document for test:
  • 2MB PDF exported from CAD drawing with around 50 layers. 

In my attempt to diagnose the problem, I have made the following notes: 

1 - CPU - Not a Problem

Are these laggy PDF, caused by a CPU bottleneck. No they are not. In resource monitor I see around 15% usage over 4 cores (2 CPUs), whilst zooming in and out on the PDF, and panning around using grab function. 

2 - GPU - Not a Problem

Monitoring use of  2x 1GB cards in Nvidia Control Centre I see a maximum of 7% usage on one card. So it is not likely that GPU bottleneck is causing problem. 

3 - Disk Read Write - Not a Problem

Nope, very little activity. Whilst causing PDF to lag, and badly render. 

4 - PDF Software - Not a Problem

I am using a very old version of Foxit PDF in 32 bit. Lets swap that for 64 bit Nitro Reader, and see if that works. No it does not help, actually worse using new software. Also tried with PDF Architect same symptoms. 

5 - Hatching In Drawings < Solution 

I have found over time that problem rests with "hatching" or solid colour fill in drawings. For example if an architect has used green colouring in on a section lawn, then that can cause very slow rendering of PDFs.

If the PDF reader you are using have a layer control panel, look for layers labelled hatch, or fill, or area. And deselect these layers I have found this helps in 90% of cases. 

6 - Convert to Image and then back to PDF

I can use PDF Architect to convert the PDF to an image (PNG / JPEG). I then print that image back to a PDF, taking care to keep the paper size the same as original to preserve scaling. This works very well in deed and is my preferred method. 


Environmental Consultants

Flood Risk Reports

Thursday, 3 September 2020

Access Land (Right to Roam) Map Viewer UK

Introduction to Access Land Map Viewer


If you have ever considered going  walking where there are no paths, then the below map may help you decide where it is legal to do that. Under the CRoW Act 2000 various areas of land have been given a "right to roam" designation which with careful planning, and an understanding of the limitations involved can be explored . 

Using Right to Roam Map 


On the below map simply insert a postcode, of town of village name, and areas shaded blue have are some type of Access Land. View Access Land Map on ESRI (Bigger and Easier to Use) 


When you are enjoying Open Access Land, please be sure to stay clear of "excepted land".

Excepted land


On access land some areas remain private (‘excepted land’). You do not have the right to access these areas, even if they appear on a map of open access land.

  1. Excepted land includes:
  2. houses, buildings and the land they’re on (such as courtyards)
  3. land used to grow crops
  4. building sites and land that’s being developed
  5. parks and gardens
  6. golf courses and racecourses
  7. railways and tramways
  8. working quarries
construction environmental management plan

Sunlight and Daylight Assessment

Tuesday, 11 August 2020

TP Link TL-WA801ND Access Point Review

TP Link TL-WA801ND Access Point 

Reviews for the the TP Link TL-WA801ND Access Point can be found by the plenty on Amazon and they are for the most part good. In fact out of 3000 or more reviews the WA801ND gets 4.5 out of 5. 

It is not hard to see why. It is from a good manufacturer and it very cheap, for what it does. It can be used as a access point, or a repeater, or as a client, enabling a wired network device to connect to a wireless network. So its pretty handy.

There are few things that people buying this on Amazon bring up as bad things about this TP Link TL-WA801ND Access Point, and I will go over some of these here.

Quoting 300 Mbps WiFi but only 100 Mbps Ethernet Port

Hmmm. Yes the ethernet point is not gigabit. So this is a bit cheeky. But unless you are doing real heavy lifting with this access point you will not notice. 

We can stream 2 HD TVs through this whilst surfing web, and listening to music on phones. So it is quite a powerful bit of kit.

As an access point the throughout would be capped at 100MPs, but as repeater it should handle 300MBPs. Although factoring two way traffic does this reduce to 150MBs effectively.  

Difficult to Set up and Slow

No. Not my finding. The interface can be a little laggy, but you get that on a lot of networking equipment. 

Some say that when they change the SIDD or login details they loose the connection. This happens on nearly all networking gear with these features. 

Signal Strength 

Not amazing, although 2 or 3 can be used to get wi-fi over large area. We have one that "shoots" wifi to a netgear repeater which then take wifi in to house. 

Reliability 

Occasional stuff breaks. I have had lots of networking gear of the years of all types and makes. Most has broken over time. Whether this is burnt out internals, or misdiagnosed problems passed down from other pieces of hardware (such as DHCP fault on router) who knows. Based on amazon reviews these have a 0.5% failure rate. And if you look at all the other wireless access point available, they all have failure issues too!

Conclusions 

This is a very cost effective piece of kit. It has a few problems, but most of these are found in all access points. 


Flood Risk Reports

Environmental Permit Applications

Thursday, 6 August 2020

TP Link CPE210 vs TL-WA801ND

TP Link CPE210  vs TL-WA801ND Access Point 

As with many folk in the UK we live in a oldish house with walls made of 3 meter thick depleted uranium, and getting a wireless signal around the house is a bit tricky.  

I have been using a TP Link TL-WA801ND Access Point for around a year with mixed results. I have a small wooden hut in the garden that I house various centralised network bits in such as file stores and the TL-WA801ND. It give a weak signal in the house.

I wanted to improve on this and so found the TP Link CPE210 on amazon for £46 ($90). I think I have misunderstood what CPE210 is for, so I will share thoughts in below.

I should point out that the CPE210 is designed to do 4 or 5 different jobs. Such as bridging two wire networks over a long distance, or beaming a signal for use at a specific point (office at end of garden for example. 

This page would also be relevant for comparisons between TL-WA901ND, and CPE510 / CPE710.

"Beam" Width

Whilst the TL-WA801ND splashed wi-fi goodness in all directions, the CPE210 delivers it output in a very focussed beam. 

The CPE210 Instruction Manual Shows Typical Usages. 


So my expectation that it would do the same job as the TL-WA801ND was incorrect. In use as an access point you will find that this narrow beam provides excellent signal strength along the beam path, but it fades rapidly from one direction when sidestepping. 


Simplified Coverage PAtterns

When used as an access point therefore, the CPE210 is best used for long reach small area applications. It would be ideal for beaming wi-fi to an office at the end of the garden. But do not expect wifi coverage for the whole garden. 

Further web snafflings show above diagram. Available from here. So it may be the case that you could mount this access point too close to where the signal is required and that might cause problems. 

Setup

If you have set up a router or access point before then you will be able to configure the CPE210, much the same as the TL-WA801ND. 

The CPE210 has a few more options. 
The Setup Interface for the CPE210 is Relatively Simple although is has lots of options. 


Using TL-WA801ND and CPE210 Together


The TL-WA801ND and CPE210 could be used very nicely together.  The CPE210 could be used as an access point to beam, wi-fi to the end of a garden or to far corner of industrial site, with TL-WA801ND used as a client to pick up signal, or as a repeater to "spread" the signal around in that area. 

Conclusions 

CPE2010 - Good for far reach narrow beam applications.

TL-WA801ND - Good for wider area coverage. 

I found that whilst the CPE210 delivered excellent coverage in one spot, it did not cover house and office as expected. This was due to my misunderstanding of the products function, rather then a fault with the equipment. 

Environmental Consultants

Flood Risk Reports

Saturday, 11 July 2020

Makita Cordless Strimmer (DUR187LZ) - Review

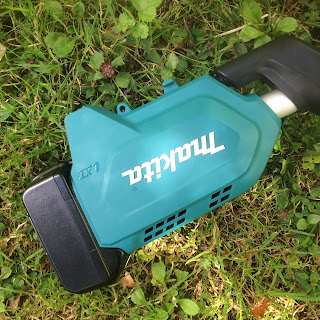
Ah! Strimming the Garden. One of Life's simple pleasures. And it is a complete, joyful pleasure using this Makita  DUR187LZ Strimmer Brush Cutter. This is one of the most pleasing tool purchases I have made in the last year.


This strimmer works with the familiar bump line head, which you might find a wide variety of 2 stroke powered strimmer and brush cutters. But things are quite different in all other respects.


At the "top" of the strimmer, where the motor normally goes you have the battery housing, and I suspect the motor controller. A small fan keeps this cool I think which is activated when you pull the trigger. The battery is an 18v LXT battery, which can power around 100 different tools (drills, lawn mowers, even vibrating concrete pokers).

The battery will last a good 20 minutes. And that can be doing heavy brush cutter type work (long grass, herbaceous species (cow parsley, doc), and thing woody suckers such as ash saplings. 


The control are simple, yet offer good variety you have 3 speeds to choose from, and also an automatic speed controller, which speeds up and down automatically depending on the type of work you are doing. This function is demonstrated in the video at the bottom of the page. 


The handle is simple in design, and can be held easily. The strimmer comes with a shoulder strap, which I do not use. Some have said this stimmer is very light. . .  I would not agree, it is probably as heavy as my 22cc 2 stroke (husqvarna) strimmer. 


The strimmer comes supplied with some 1.5 mm cutting line, which is fine. Shown here with stihl 3.3mm line. One of the best bits about this strimmer, is that I have not had a single snapped line in the several hours I have used it. My petrol strimmer had a tendency to rev up, to extreme speeds causing the line to snap, when hits a solid object. 


The strimmer head will take commercial grade line, and can handle the implied work load. In use the torque is very high, and especially with a battery >50% charge, will mash up just about any vegetation. 


So to conclude the strimmer is excellent. I can't really remember when I purchased a piece of equipment that I was so pleased with. There are no fumes, when you use it. No need to buy or mix fuel. No starting issues.


Makita also offer, some more powerful strimmers based on the LXT batteries. Which take 2 batteries upping voltage to 36v, likely to allow for higher wattage motor. Whilst I would of course be interested to try one of these more powerful strimmer / brush cutters, this DUR187LZ model provides plenty of power for me, whilst remaining fairly light weight.


Scientific Web Content

noise management plan

construction environmental management plan

Saturday, 4 July 2020

Noggins / Noggings & Floor Joists (Strutting)

Noggins / Noggings & Floor Joists (Strutting)


In the UK, my 77 year father calls the strutting between floor joists "noggins" this is also spelt noggings in some circumstances. Trying to search for spacing for noggins, is tricky. You may have more luck with "strutting"


So I found the below table on NHBC Campaigns Website , which gives spacings fro strutting as follows:


I also found NHBC Standard PDF which give the same table:


As the below  image shows for me I needed a row of noggins or strutting in the centre of joists only. If you are using joist hangers however, you will perhaps need a row of noggins down each side. This is not always the case, but you may wish to check with building inspector, or building regs plans issuer. 


noise management plan

construction environmental management plan


Thursday, 4 June 2020

Feider BRE24V Review & Assembly

Feider BRE24V Electric Wheelbarrow Review & Assembly

Introduction

Some have reported this to be a good product, but for me the Feider BRE24V Electric Wheelbarrow
lasted 3 loads before it stopped working.  Either a problem with the motor, motor control or demand side BMS. I suspect motor controller.

My reason for purchasing the Feider BRE24V. I am 3 weeks in to a self build project, and I needed to quicken up shifting around 2000 concrete blocks for our house extension . I can cope with 3 or 4 blocks in a regular barrow, if I could up this to 6 or 8 blocks (I thought) then this would speed things up.

Cheapest half decent looking powered barrow on web, was Feider BRE24V Electric Powered Wheelbarrow.

Despite being well built, and well specified my experience with this product was overwhelmingly negative.
Subtle Changes in Geometry make this wherl barrow very hard to use. 

Assembly

Assembly is not too bad. The instruction are poor and in french. But provided you assemble the parts in the right order you should be OK. There are diagrams in the istruction book showing the write order to do things, and that is all you really need.

You will need a large screw driver (phillips / pozidriv) and an adjustable spanner. And around 1 hour of time, maybe a bit more. Watch a video on assembly:


You also need to allow some time for charging the battery.

The electronics go together nicely, and can only be put together the correct way, so no chance of mishap there!

The lower frame comes in 3 or 4 parts, and I thought this might affect the rigidity of tghe barrow, but the assembly works in such a way that all parts are bolted to the skip, and in the end the structure is very rigid.

Problems


Beyond the electronic fault which quickly developed, the geometry of the wheelbarrow is perhaps the most disappointing aspect :

Breakdown

I had a load of concrete in the wheelbarrow, I would estimate this load to be around 100kg. The motor was struggling and stopped half way up slope.

Workings using approx 66% of 75 litre capacity = 50 litres. 2 kg per lire density = 100kg. The advertised load capacity is 150kg.

I was going up a short (3 meter) 8 degree slope. Advertised max slope is 15 degree slope.

It may not be the motor that was struggling, it could have been the motor controller or the BMS. I suspect motor controller. As since failure there is resistance in wheel indicating short in phase wires. I would be very surprised if the motor failed, it seams very heavy duty.

Drive Wheel is Too Large


The drive wheel used is too large. To accommodate this the skip has been moved backwards, moving the centre of gravity towards the rear.  If you are are on hard smooth ground then this is not a problem, the small rear wheels will take the weight, but if ground is rough or soft, and your are forced to take weight on arms, it is very hard work (reasonably fit 40 year old bloke, conditioned by 3 week of "normal" wheelbarrow use).

Handles Too High


The handles have been raised too, no doubt to help when using rear wheels, but this makes tipping the barrow very difficult when carting heavy material.

Nose Too High


The nose of the barrow is also too high meaning the barrow has to be tipped up very high before is stops rolling forwards. If you are tipping in to a hole then, this can result in the wheel barrow rolling forward and ending up in the hole.

Good Points


This wheelbarrow would be good if you had a long distance to haul material, but the ground surface would have to be smooth and hard. A stable yard, or a garden with hard paths would be ideal. For heavy work on rough ground with lots of tipping, look elsewhere.

Conclusions 

Even without the breakdown, this is a very poorly conceived product. I doubt the people who designed this has ever used a wheel barrow. It is almost as though the barrow has been assembled around a collection of electronic components.

There are instances where this barrow might make you life easier (hard smooth ground) but for me it was a relief to get back to a "normal" wheelbarrow.


Lots of Pictures


The Hub Motor seams like a nice bit of kit, I expect this is worth around £150 on its own.

The thumb throttle and tacky grips are functional

Terrible small rear wheels are a serious limitation. 

Long, high handles make for hard work when tipping. 

Large front wheel is grippy, but upset geometry of whole barrow.

Weird grips. 

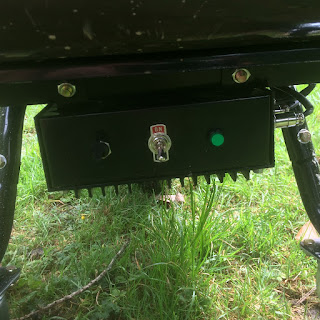
Box containing controller and BMS and battery pack. Nice chunky switch. 

Cabling attached with zip ties. 
construction environmental management plan

Planning Applications

Sunlight and Daylight Assessment

Friday, 8 May 2020

RUTX09 Industrial Router - Review, Install and General Guide

This a post detailing my install and opinion of the RUTX09 router from Teltonika. I am using this at home, I run a business from home, and we have 3 kids home schooling during lock down.


A few weeks ago we started having problems with our MR6400 router, it the TP Link router was freezing and locking up.

We were using the router very heavily at the time, so when searching for a new router I included the phrase "industrial" hoping for some heavy duty offerings. This a 3G 4G router for mobile broadband.

Firstly if you would like to watch a video instead, please do:


When searching I was met with a mixture of offering from Cisco (around £1000) and a new company Teltonika, which I hadn't heard of. These range in price from £150 to £350, and the hardware specifications were good, and that couple with ability to use open source linux software on them made the decision.


I got mine from NetXL, the delivery was very good, next day, even when ordering in afternoon. I had previously bought a ponty XPOL antenna from them so was sure it would be sent quickly.

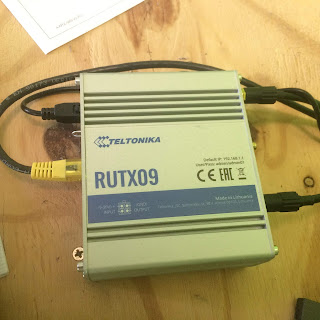
The RUTX09 router is well built, with an all alloy construction. It runs on an ARM processor (which is the same they use in iphone).

It is fairly self explanatory putting it together. I was little surprised that there was no wifi, but that's my fault for not checking. Easy to set up using old router.


The inclusion of a GPS antenna, leads me to think perhaps this router is vehicular applications (?) not sure.

The router includes a small tool to remove SIM tray and install, which is neat.

In any case I was soon logged in to the configuration interface which, first lands on a 4 stage setup. I had the router connected wired to my main PC, and I noticed the speed was very good, the internet felt more snappy straight away. Download speeds increased from 30MB/s to around 40MB/s.


HOWEVER, none of the wireless access points seamed to have internet access, and network connectivity (when looking at client list) was patchy and sporadic.

Note: My home network consists of:


  • Router RUTX09
  • Netgear Switch (5 Port) to
  • 100M ethernet cable to 
  • Netgear Switch 20 Port to 
  • Power Line Adaptor (Netgear)
  • To Access Point
  • Additional Access point (also via additional Powerline adaptor)


I tried in vein for around 7 hours to get the network operational, I switch everything on and off again (the whole system), checked all IPs, MACs and DHCP settings. I reluctantly upgraded firm wear, which went OK!

Then I found a little setting on Network > LAN > Edit LAN > Relay Configuration

Whether it was luck, or this was the correct setting for wireless access points I do not know. After enabling I noticed the firewall rules had automatically changed. So perhaps it is a pre-set for firewall configuration.


Any how, now the RUTX09 router is up and running is it an absolute sledge hammer. It can run 2 HD TVs, 3 Video Conference Laptops, and my main PC. It is rock solid.

With the same antenna, and same reception our old TP link router could not handle web use and TV watching at the same time, and could not handle 2 x HD TVs at once. The failing must have been on the TP Link Router's behalf, as the down load speeds were alway 30MB/s plus, so should be enough for 2 TVs and a few laptops.

So all in all it works very well, and I would suggest give this or another Teltonika Router a whirl. Since setting it up, everything has been working A-OK, with no crashes or evene delays.

They seam extremely well made . . .  they just need a few setup presets for dumb asses like me!

Sequential Test

Scientific Web Content


Friday, 1 May 2020

TP-Link TL-MR6400 Freezes or Crashes

TP-Link TL-MR6400 Freezes or Crashes the Symptoms


About 2 years ago we moved to mobile broadband, the TP-Link TL-MR6400 has been very good over that period, up until around 1 month ago when it started freezing and or crashing.

Typically in our case this involved a loss of internet connection, and when you log in to the router (which appears still to be running) the status page is partially blank. As pictured below:


The problem can be fixed by rebooting from the GUI (system tools > reboot) or by switching off the router and back on, either on wall socket or button on the back.

I should say that this crash and freeze behaviour has coincided with the CV19 lockdown, which means we are running TVs, and 3 computers through this TP-Link TL-MR6400. I am also using an external antenna.

Things I have Tried to Fix This 

I have tried a few things to solve this problem. They are just shots in the dark, and some I am not sure if they have worked, as time will tell. To be clear none have the below have worked, I am just checking off options. 

Detach Unnecessary


This first thing I suspected was some sort of power overload (don't mock me I just try things out based on imagined scenarios). So I unplug all but one of the ethernet cables, and then used a network switch to take from there. Previously I was using all 4 ports, now just 1 so did this work? This did not work. 

Overheating

Next I thought perhaps overheating was causing the problem. So I rigged up a "wind tunnel" cooling system, as pictured below. There are vent holes around the perimeter of the casing so air should pass through the router as well as around it. 


It is basically a box, to force air around and through the router housing. I used an arctic cooling F12 fan, there was a notable draft through the box, and the previously warm router was stone cold. This did not fix the problem. 

Turn Off 4G


Again, thinking about putting less stress on the router . . . . what about turning network mode to 3G only? This can be done on router config page. (Network > 3G Only) 

I have just tried that and will report back in a few days. Update: Wow. 3G is really slow. Not really an option to put up with that. 


Other Ideas

Here are some other ideas explored:

External Antenna is Causing Crash?

I would say no. We had used a cheap external antenna for around 1 year, with no problems what so ever. The system had not been changed and yet the problems arose. 

Overuse Causing Crash?


Does too much bandwidth cause a crash? I am not sure, I haven't really seen a correlation. The router typically crashes in the evening. This would coincide with watching TV . . .  which is a heavy use, but on the other hand we have watched TV on 2 TVs for long periods without it crashing.

Please chip in in comments if you have answers or ideas.


Ciao

Thorpy


Environmental Consultants

Flood Risk Reports

Environmental Permit Applications

Wednesday, 22 April 2020

Windows - How to Install - npm install -g firebase-tools

Windows - How to Install - npm install -g firebase-tools


If you are trying to use Firebase for web hosting then the first real obstacle (as a noob) you will come up against is running:

npm install -g firebase-tools
My immediate questions were:


  • Where do I type in this command?
  • Do I need to type in this command?
  • Can I use a web app?
In short I was left with little idea of how to begin, or whether the suggested way was the easiest. I will try to explain what is going on in layman's terms:

The above commands are run in windows command prompt after you have downloaded some bits of code and stored them on you computer. 

The instruction you need are all in the guidance documents, but these were not dumbed done enough for me. . . . 

Step 1 - Run a DOS Box Program to Put Some Files you Need on your PC


Install the above program (Firebase CLI), it is very basic, and resembles a DOS window. Let the program run. My setup returned some errors, but it didn't seem to affect onward progress. 


Close the windows when program has stopped running. 

Step 2 - Run this New Program

So now you have installed firebase tools, you can open command prompt and (search: cmd) and type in the command: 

npm install -g firebase-tools

Now you can use command prompt, to run any number of tools, to set up web hosting on google firebase. Just type "firebase XXXXX"


Scientific Web Content

Google Maps Ranking

Monday, 20 April 2020

Poynting XPOL-2 V2 Review & Install

Poynting XPOL-2 V2 Review & Install - Intro


Are you in the market for a Poynting XPOL-2 V2 Directional Cross Polarised LTE MIMO Antenna? Here are the wheres and whys, and my findings having purchased one.

Poynting XPOL-2 V2 Review & Install - What is It?

The Poynting XPOL-2 V2 (Poynting XPOL-2 V2 Directional Cross Polarised LTE MIMO Antenna) is an antenna (like an aerial) that you attached to your 4G router, and it "collects" more signal strength from the available signal, leading to the following advantages:


  • Lower latency
  • Higher Bandwidth
  • Less Drop Out
  • Stronger Signal
The antenna consists of 5 meters of high quality low loss coaxial cables, and gold plated SMA connectors, and the antenna itself, which is at 25cm x 25cm (9" x 9") plastic box with female threaded attachments on rear.

The cable come pre-attached, and the box included mounting brackets. You will need a round section pole to mount it on. 

Square 50mmx50mm lower section with round tube on top.


Poynting XPOL-2 V2 Review & Install - How to Install

In order to use this antenna, you will need a 3G or 4G router such as:

  • TP-LINK TL-MR6400 (As pictured below - I have this one)
  • TP-LINK AC750 MR6400
  • Huawei B593 B315 B525 E5186
  • NETGEAR M1 MR1100 NIGHTHAWK ZTE MF279
  • Huawei E5186
Some of the later model of the TP Link MR200 (Version 3) do not have removable antenna, make sure your router has SMA connectors, or you will have to buy adaptors TS9 is another popular fitting that is easily adapted.

Open the box, and inside you will find all that is required to attached the antenna to a pole  it will not be easy to mount to a square post, or a wall, as setting the direction of the antenna, so its front flat face is pointing at the nearest mobile mast. It will require a round post to the mounted on.

It is important to note that this antenna will likely improve you 3G 4G experience whether it is mounted internally or external. External is preferential owing to lack of obstacles such as walls. 


In my case I used, a square wooden lower post, and a short length of round tube, on the top, which allowed for rotation. If you are looking to fix this to a wall then perhaps a "Satellite Wall Mount Bracket " would do the job.


The cable is 5 meters long. So this runs down from where you have mounted the antenna (some report putting in loft works OK) and at some point you will likely have to drill a hole in the wall. You need a 20mm drill bit, so you can get both connector though side by side. It is best to wrap the connectors in a little masking tape, to stop them getting dusty or scratched. 

Drill a hole in wall to pass through cable (on right in this picture)
One of the trickiest parts of the setup is pointing the antenna accurately at the mobile mast. If you can see the mast then that is all well and good, but if not it can be tricky to envisage where the mast is. I guessed at first and I was around 5 degrees off, which was the difference between 75% signal and 100%, so it is worth getting right.


I used the "measure" function on google maps to draw a line from the antenna location, to the nearest mobile mast. The line will cross something that you can see (house next door for example), and it is easier to line up with something close by than trying to guess. It transpires it is 1.9miles to my nearest mobile mast. 

Poynting XPOL-2 V2 Review & Install - Why Would I Need One?

If you are in any of the following situations, then you might benefit from using this XPOL-2 antenna:
  • Rural and urban areas
  • Poor data signal reception (indoor or outdoor)
  • Slow data transmission connection areas
  • Unstable connection
  • Increase system transmission reliability
  • LTE fringe areas (close to an LTE area, but just out of reach)
In my case I was probably non of these, as I could get about 16MB a second using a cheapo external antenna, but I needed a higher bandwidth so as to get more data (I had three kids using video chat during lockdown for CV19 2020), and had read that a good quality antenna would help. It did.


The new antenna, nearly tripled by down load speed, and upload speeds. I also noticed a slight drop in latency time (a good thing). 

Strangely enough despite this large jump in performance the signal strength did not change. With my router still telling be 75%, which was the same as the cheapo antenna. However, after fine tuning the direction of the antenna, which was off by about 5 degrees this did go up to 100%.

Download speed went up to over 50MB/s after this fine adjustment. 

Poynting XPOL-2 V2 Review & Install - Conclusions

This is a high quality directional antenna, that really works. If I had swapped this for the stock internal antenna, I would have seen a 500% increase in bandwidth, as it stood I still managed to get a 300% increase even when replacing an external antenna from another manufacturer. 

It is quite expensive, at £110 (compared to £25 for cheapo version) but I am very pleased with it. 

If you are out of reception, or not getting enough bandwidth, I would give this a wizz, it works miracles. 


Environmental Consultants London

Flood Risk Assessment London

Friday, 17 April 2020

Thorpy's Guide to 4G Broadband (or Mobile Internet)

1 - Thorpy's Guide to 4G Broadband - Intro


I was in the process of typing up an email to send to my Mum, explaining the set up of our 4G Broadband, and thought it might make a good blog post. So here you go Mum!

1.1 - Costs 


Running costs when you are up and running will be around £30 a month. Which is comparable to line rental and copper broadband contracts.

Setup costs would be £80 for router and if you want to go all in, another £150 for an external antenna.

1.2 - Time to Set Up


Not very long. 20 minutes once you have all the bits. Longer if you use an external antenna.

2 - Thorpy's Guide to 4G Broadband - Router


In order to get good high speed internet over a mobile network, and attach to other devices you already have (mobile phones, smart TVs and PCs) you will need an LTE Router.

I have a TP-Link TL-MR6400. Which have been very reliable, and allows for wireless and wired network connections. You could use some sort of dongle, but I would recommend the below product. It has served us very well, and has a few features that are very handy.

Unlike a normal router, which connects to your phone line, this router has a slot for a SIM card in the back. So you put in a SIM card in it, and it gets the data over the mobile network rather then the phone line.

Using the above router, you simply insert the SIM card, plug it in and then you can connect to the wireless signal, via the default access IP of 192.168.1.1 (Type this in the address bar of you browser - phone or PC it doesn't matter) . It is very easy to use and comes with instructions.


3 - Thorpy's Guide to 4G Broadband - SIM Cards


To watch a 1 hour program on BBC you will use about 1 GB of data. If you have kids watching 2 or 3 hours of TV everyday and playing computer games etc. you can use LOADS of data. Last month I was backing up files online, on top of normal TV and work use, and used 1200GB.

So it is important to choose an unlimited data plan, other wise you will pay lots of charges for going over your limit. BUT you may wish to test things out before you commit to a long term contract . . . .

3.1 - Testing Out with PAYG SIM


Before you sign up for a 12 month contract it might be worth trying out the router with a pay as you go SIM, to see if it works for you.

You could also try the router with the SIM from your phone, but it is unlikely the SIM will be the same size. As the router take a full size (old school) SIM card.

3.2 - Getting an Unlimited Contract


I use a Vodafone "Unlimited" Plan it includes minutes and texts which you won't use, but the unlimited data, is what you are after.

Remember, if you do not want to sign up for a 12 (or 24) month contract you can get a 1 month "rolling" contract. So you can pull out any time.

4 - Thorpy's Guide to 4G Broadband - Coverage

This router will work with 3G or 4G so if you have coverage for either then it should work OK. Simply choose an operator (eg. Vodafone) that you like the look of, and use a "coverage checker" to see what signal you get.

Coverage at Cold Comfort

So for my Mum she is OK, because apparently she has coverage of 3G and 4G. And this is for phones. . . she will get a better reception using a router with big aerials.

5 - Thorpy's Guide to 4G Broadband - Bandwidth

Bandwidth is the rate at which data can be delivered to you property. To stream music on Spotify, or watch Netflix in standard definition you need 1.5 megabytes every second. 

That is not a great deal. But for many rural households and businesses a copper wire will not provide that. I live in an area where my router picks up a 50% signal, and I am able to get:

So whether you use 3G of 4G and can get a 50% signal (2 bars on phone) you should be able to watch videos and stream music from spotify etc. 

With a very good signal you could get 20, 30 or even 40 MB/s which is enough to watch 3 or 4 HD TV sets at the same time.  

6 - Thorpy's Guide to 4G Broadband - External Antenna

You may not need an external antenna. But fitting one will increase you bandwidth. There are two main types directional and omnidirectional. 

 Things to look out for are:

  • MIMO
  • Nice Long Cables (5 meters or more is good)
  • SMA connectors
If you are unsure which to get then get Omnidirectional

6.1 - Directional - If you know here you closest mast is. 


I am writing this during the CV19 lockdown, and next week I will have 3 kids at home using internet video conferencing, and I will be working from home also. So my durrant 10MB/s may well not be enough. 

A Directional Antenna


I can reliably increase my bandwidth by using an external antenna. These range in price from about £25, to about £150. I have tried the cheap type. And this gave a 25% increase in signal strength, with my bandwidth increasing from 10 MB/s to about 16MB/s. If you intend to use the antenna at you house (where you won't move it), and you live close to one particular mobile phone mast then it s a good idea to choose a directional antenna. Both of the above antennas are directional.


You need to point them at your nearest mobile phone mast that your carrier uses. A taller pole, to mount the antenna on, may help. 

6.2 - Omnidirectional

An omni direction antenna, is good if you live between several masts, or you don't know where they are. Omnidirectional antenna, look a bit different. I have never used one, but they get good reviews. Provided you buy a decent one. 


7 - Thorpy's Guide to 4G Broadband - Pictures of My Setup

For simplicity have included a few picture of my set up. 


Picture of router with various network cable stick out of back. Antenna cables are the black ones with the gold connectors.

 The antenna cable then go through a hole drilled in the wall of my shed (shoffice) and outside. Some people mount there antenna in the attic, to save drilling through walls.


Cables are run down wall slightly to prevent water trickling inside. 


Cheap directional antenna attached on top of wooden pole. As high as I could get it with supplied 3 meter cables. Its flat face is pointing towards out nearest mobile phone mast which is 2.63km away. 


Waste Transfer Station Permit

Flood Risk Assessment London


Monday, 6 April 2020

Viper Special Ops Boot Long Term Review

Viper Special Ops Boot Long Term Review - Intro

I have just received my 2nd pair of these in the post, I have replaced my original pair after about 5 years, as they have become a bit floppy and the grip is nearly gone. But They have been the comfiest pair of boots I have every owned.

The boots are 5 years old, but I only wear then during the spring, autumn and summer, as they are only splash proof, and opt for wellies the rest of the time.

The right hand boot in the picture is the old boots, it is sagged down and shows signs of wear. The left foot boot is barnd new the colours are more vivid, and the leather is grey rather then brown.
Old Meets New


These are NOT TO BE CONFUSED with boots labelled "COMBAT" which are similar is design, but made from inferior materials.

Viper Special Ops Boot Long Term Review - Comfort

The main reason for a 2nd purchase is the high level of comfort afforded by these boots. They are light, flexible, but feel robust. They are very easy to get on and off, thanks to the zips and either side. 

The boots are supremely comfortable.

Viper Special Ops Boot Long Term Review - Wear

The boots are light yet tough, having severely layers of leather, and testile to produce a reslient upper. Even after the leather has perished there are other textile layers underneath to keep the boot functional.

hole in lether of boot which reveal secondary layer of non woven geotextile, the boot is still functional.
Perished leather. Note secondary layer of textile. 

Zips still work fine after 5 years.

Some fraying around zip araes.


After 5 years of use the cordura side panels look like new, and ykk zips work very well still. The failure pints are perished leather (suede) and worn soles.

One other failure point is the heel, where it can rub through and expose a hard plastic plastic piece, used to shape the heel. This happened around year 3.  A solution here is to pull out this piece of plastic, and you will have your wearable boots back once again.

Rub through on heal.


Viper Special Ops Boot Long Term Review - Uses

These are great for walking as you would expect, but are also good for a spot of running owing to being light weight. The sole being broad a relatively flat is also good on MTB pedals, and these are by chosen footwear if weather allows. 

Trusty Old Boots, Tired but not finished. 

New boots vs Old Boots 

Viper Special Ops Boot Long Term Review - Water Proof

No these boots are not water proof. They are about as water proof as a trainer. Most of the disappointment, which one can read in review regarding these boots relates to their lack of water proofing.


To make these boots water proof would be (in my opinion) be a compromise as they would likely loose some of their breathability and become heavier. 

About 3 years of use (prorata) over 5 years.

As new. . . .
Environmental Consultants London


CEMP